ApplicationModes
Windows Ribbon for WinForms library now supports Application Modes. The result of this post is a yet another sample, “13-ApplicationModes”, found on the project site.
What are application modes? It is best to explain using examples. Applications sometimes have different “modes” in which they show different GUI, for example:
-
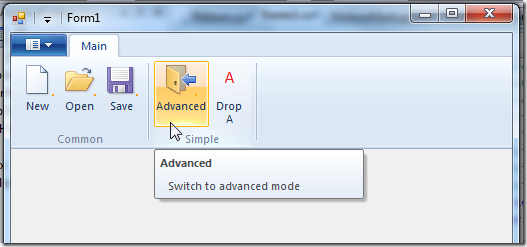
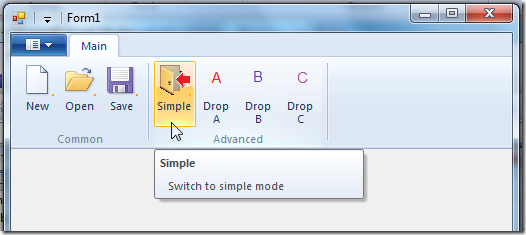
Simple mode VS Advanced mode
-
Regular editor mode VS Print mode
The ribbon framework support changing its GUI according to the current application mode. In order to use the ribbon application modes, you need to:
-
Set the available application modes for each ribbon item. This is done in design time.
-
Set the current application mode. This is done in run time.
To summarize, application modes is a feature that allows the ribbon to change its GUI according to the current application context.
More details on this subject can be found at Reconfiguring the Ribbon with Application Modes on MSDN.
Using ApplicationModes extra remarks
-
You can set up to 32 different application modes, each identified by a number between 0 and 31.
-
Modes can coexist, meaning you can set both simple mode and advanced mode as active at the same time. Internally the current application modes are represented by a single 32bit variable (which represents a Boolean array of size 32), thus explaining why you can only have 32 modes.
-
Mode 0 is the default mode. So, if you don’t set the ApplicationModes attribute, 0 is the default.
-
At least one mode should be set at all times. You can’t disable all the modes (the framework will just ignore your last set).
Using ApplicationModes – Ribbon Markup Following is an example of the views section where you set the ApplicationModes attribute:
<Application.Views>
  <Ribbon>
    <Ribbon.Tabs>
      <Tab CommandName=“cmdTabMain“ ApplicationModes=“0,1“>
        <Group CommandName=“cmdGroupCommon“
               SizeDefinition=“ThreeButtons“
               ApplicationModes=“0,1“>
          <Button CommandName=“cmdButtonNew“ />
          <Button CommandName=“cmdButtonOpen“ />
          <Button CommandName=“cmdButtonSave“ />
        </Group>
        <Group CommandName=“cmdGroupSimple“
               SizeDefinition=“TwoButtons“
               ApplicationModes=“0“>
          <Button CommandName=“cmdButtonSwitchToAdvanced“ />
          <Button CommandName=“cmdButtonDropA“ />
        </Group>
        <Group CommandName=“cmdGroupAdvanced“
               SizeDefinition=“FourButtons“
               ApplicationModes=“1“>
          <Button CommandName=“cmdButtonSwitchToSimple“ />
          <Button CommandName=“cmdButtonDropA“ />
          <Button CommandName=“cmdButtonDropB“ />
          <Button CommandName=“cmdButtonDropC“ />
        </Group>
      </Tab>
    </Ribbon.Tabs>
  </Ribbon>
</Application.Views>
In this example we create a tab with 3 groups in it: Common, Simple and Advanced. The common group should always appear so we set its ApplicationModes attribute to “0,1” The simple group should only appear in simple mode (0). Similarly, the advanced group should only appear in advanced mode (1). Note that the tab element should appear in both modes, so you must also set its ApplicationModes attribute to “0,1”. Note that you have to set an ApplicationMode to each possible Element if you use ApplicationModes for only a few elements. Otherwise you can get a Shutdown of your application when you switch the ApplicationMode.
ApplicationModes can be set on the following elements:
- Core tabs (as opposed to contextual tabs).
- Groups which are children of core tabs.
- Button, SplitButton, DropDownButton, SplitButtonGallery and DropDownGallery but only when those controls are in the application menu.
ApplicationModes – code behind Following are two ribbon buttons, “simple” and “advanced”, each changes the current application mode:
private Ribbon _ribbon;
private RibbonButton _buttonSwitchToAdvanced;
private RibbonButton _buttonSwitchToSimple;

public Form1()
{
    InitializeComponent();

    _ribbon = new Ribbon();
    _buttonSwitchToAdvanced = new RibbonButton(_ribbon,
                                (uint)RibbonMarkupCommands.cmdButtonSwitchToAdvanced);
    _buttonSwitchToSimple = new RibbonButton(_ribbon,
                                (uint)RibbonMarkupCommands.cmdButtonSwitchToSimple);

    _buttonSwitchToAdvanced.ExecuteEvent += new EventHandler<ExecuteEventArgs>(_buttonSwitchToAdvanced_ExecuteEvent);
    _buttonSwitchToSimple.ExecuteEvent += new EventHandler<ExecuteEventArgs>(_buttonSwitchToSimple_ExecuteEvent);
}

void _buttonSwitchToAdvanced_ExecuteEvent(object sender, ExecuteEventArgs e)
{
    _ribbon.SetModes(1);
}

void _buttonSwitchToSimple_ExecuteEvent(object sender, ExecuteEventArgs e)
{
    _ribbon.SetModes(0);
}
The Ribbon.SetModes method is just a simple wrapper that converts a byte array to a compact 32bit integer and pass it to the relevant framework function:
public void SetModes(params byte[] modesArray)
{
    // check that ribbon is initialized
    if (!Initialized)
    {
        return;
    }

    // calculate compact modes value
    int compactModes = 0;
    for (int i = 0; i < modesArray.Length; ++i)
    {
        if (modesArray[i] >= 32)
        {
            throw new ArgumentException(“Modes should range between 0 to 31.”);
        }

        compactModes |= (1 << modesArray[i]);
    }

    // set modes
    Framework.SetModes(compactModes);
}