ApplicationMenu with Buttons
Before we start to use ribbon features, we must learn the basics of ribbon markup.
Commands and Views
A command is an action that is identified by a number, it can be opening the save-as dialog, printing the current document, closing the application, etc. everything you can do in a function call.
A view is a graphical representation of [usually several] commands. It defines the type of controls used to activate the commands and their size, order and layout on screen.
So using commands and views is actually just another instance of the MVC design pattern, which allows us to separate business logic from presentation logic.
Now we will write a new WinForms application with ribbon that uses the application menu with simple buttons. We start this sample with an empty WinForms project that already includes ribbon support (see previous post for details). On the next sections I’ll explain:
- Commands part of the ribbon markup
- Views part of the ribbon markup
- code-behind, responding to ribbon events
As always, the entire code is available at github.com
General markup review Just a reminder, our basic ribbon markup looks like this:
<?xml version='1.0' encoding='utf-8'?>
<Application xmlns='http://schemas.microsoft.com/windows/2009/Ribbon'>
  <Application.Commands>
  </Application.Commands>
  <Application.Views>
    <Ribbon>
    </Ribbon>
  </Application.Views>
</Application>
Defining Commands in Ribbon Markup Following is a definition of some commands in ribbon markup:
<Application.Commands>
<Command Name="cmdButtonNew"
Id="1001"
LabelTitle="&New"
LabelDescription="New Description"
TooltipTitle="New"
TooltipDescription="Create a new image.">
<Command.LargeImages>
<Image>Res/New32.bmp</Image>
</Command.LargeImages>
<Command.SmallImages>
<Image>Res/New16.bmp</Image>
</Command.SmallImages>
</Command>
<Command Name="cmdButtonOpen"
Id="1002"
LabelTitle="Open"
LabelDescription="Open Description"
TooltipTitle="Open"
TooltipDescription="Open an existing image.">
<Command.LargeImages>
<Image>Res/Open32.bmp</Image>
</Command.LargeImages>
<Command.SmallImages>
<Image>Res/Open16.bmp</Image>
</Command.SmallImages>
</Command>
<Command Name="cmdButtonSave"
Id="1003"
LabelTitle="Save"
LabelDescription="Save Description"
TooltipTitle="Save"
TooltipDescription="Save the current image.">
<Command.LargeImages>
<Image>Res/Save32.bmp</Image>
</Command.LargeImages>
<Command.SmallImages>
<Image>Res/Save16.bmp</Image>
</Command.SmallImages>
</Command>
<Command Name="cmdButtonExit"
Id="1004"
LabelTitle="Exit"
LabelDescription="Exit Description"
TooltipTitle="Exit"
TooltipDescription="Exit application.">
<Command.LargeImages>
<Image>Res/Exit32.bmp</Image>
</Command.LargeImages>
<Command.SmallImages>
<Image>Res/Exit16.bmp</Image>
</Command.SmallImages>
</Command>
</Application.Commands>
Explanation: here we define 4 different commands. Each command has properties assigned either by xml attributes or child elements. We use the following (full list is available at “Commands and Resources” on MSDN):
- Name – this name is used later in the views section to reference to this command
- Id – this is the ID of the command. We get it in code when a command event occurs.
- LabelTitle – the label title of the command
- LabelDescription – the label description of the command
- TooltipTitle – the tooltip title of the command with bold font
- TooltipDescription – the tooltip description of the command
- LargeImages – large image filename for the command, usually 32×32 pixels
- SmallImages – small image filename for the command, usually 16×16 pixels
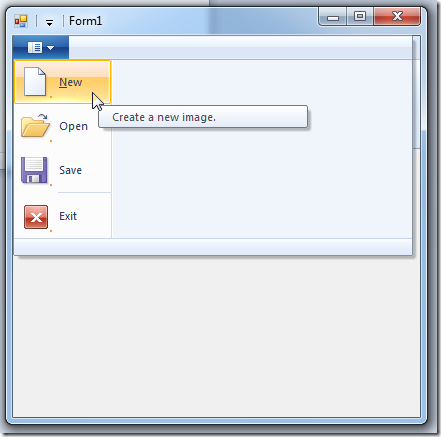
Setting shortcuts to menu items Setting a key shortcut for a menu item is done by adding "&" in LabelTitle before the letter you want as a shortcut (similar to shortcuts in the “old” menu system), see the LabelTitle of “New” command for example.
!Note
In the application "RibbonTools" you have to set just a "&" instead of "&" for setting a key shortcut.
Some comments about image resources in Ribbon markup The filename defined in the markup (like in LargeImages and SmallImages element), should be a valid (relative or full) path to a filename, otherwise the resource compiler (rc.exe) will output a compilation error: “error RC2135: file not found: filename”. The image file format should be BMP with 32 BPP ARGB pixel format. Many image editing programs, like Microsoft Paint do not preserve the highest order 8-bit alpha channel when saving, thus creating only 24-bit images, the result is that the image will not appear at all.
Under both images elements you can put several image files in different sizes, the ribbon framework will choose the best size according to the current DPI setting. For us, normal users, setting two images for 32×32 and 16×16 should be enough. For more information, see "Specifying Ribbon Image Resources" on MSDN.
Defining Views in Ribbon Markup Following is a definition of the Application.Views part of our ribbon markup:
<Application.Views>
  <Ribbon>
    <Ribbon.ApplicationMenu>
      <ApplicationMenu>
        <MenuGroup>
          <Button CommandName='cmdButtonNew' />
          <Button CommandName='cmdButtonOpen' />
          <Button CommandName='cmdButtonSave' />
        </MenuGroup>
        <MenuGroup>
          <Button CommandName='cmdButtonExit' />
        </MenuGroup>
      </ApplicationMenu>
    </Ribbon.ApplicationMenu>
  </Ribbon>
</Application.Views>
Explanation: here we define an application menu that contains two menu groups and 4 buttons. The button CommandName attribute points to the command that this button should trigger upon click.
Handling Ribbon Events Here we will see how to handle the event of clicking of one of our menu buttons.
The following code reside in our RibbonItems.Designer.cs code file:
private static class Cmd
{
     public const uint cmdApplicationMenu = 1000;
     public const uint cmdButtonNew = 1001;
     public const uint cmdButtonOpen = 1002;
     public const uint cmdButtonSave = 1003;
     public const uint cmdButtonExit = 1004;
}
public RibbonApplicationMenu ApplicationMenu { get; private set; }
public RibbonButton ButtonNew { get; private set; }
public RibbonButton ButtonOpen { get; private set; }
public RibbonButton ButtonSave { get; private set; }
public RibbonButton ButtonExit { get; private set; }
This is just a generated helper class, to make the code more readable. Every command ID gets a readable symbol.
Update (18.11.2009): Handling ribbon events is now as simple as normal .NET events. Implementing IUICommandHandler by the user is no longer required.
private RibbonItems _ribbonItems;
private RibbonButton _buttonNew;
public Form1()
{
    InitializeComponent();
    _ribbonItems = new RibbonItems(_ribbon);
    _buttonNew = _ribbonItems.ButtonNew);
    _buttonNew.ExecuteEvent += new EventHandler<ExecuteEventArgs> (_buttonNew_ExecuteEvent);
}
void _buttonNew_ExecuteEvent(object sender, ExecuteEventArgs e)
{
    MessageBox.Show("new button pressed");
}
Naturally we added to the beginning of the file:
using RibbonLib;
using RibbonLib.Controls;
using RibbonLib.Controls.Events;
using RibbonLib.Interop;
So, there you have it, a WinForms application with a Ribbon Application Menu.