JS library for building user interfaces.
Note
With react we write declarative code. We define the target UI state(s), not the steps to get there.
| Define the goal, not the steps
let content;

if(user.isLoggedIn){
	content = <button>Continue</button>
} else {
	content = <button>Log In</button>
}
return content| Define the steps, not the goal
let btn = document.querySelector('button');

if (user.isLoggedIn){
	button.textContent = 'Continue';
} else {
	button.textContent = 'Log In';
}

document.body.append(btn);- JS files are imported in script tag.
<script src="assets/scripts/main.js" type="module"></script>We can add extra attributes as defer or type=modulein modern browsers.
deferfor make sure the script that will be imported only is executed after the rest of the HTML.type=moduleis used in modern JS projects. This attribute makes sure that the JS file is treated as a JS module, this means we can import script A into script B.
// util.js
export let apiKey = "adnasdoasflak1"; // Option 1: Named exports
export default "adnasdoasflak1" // Option 2: Default
// Whitout a name. Default thing that's exported by the file.
// Also posible export a function or variable that is created before.
// Only one default export per file

export let apiKey = "adnasdoasflak1"; // Option 3
export let abc = "abc"; // Option 3
Is possible to merge 1 default and named exports.
// app.js
import { apiKey } from "./util.js"; // Option 1
import apiKey from "util.js" // Option 2
import { apiKey, abc as content } from "./utils.js" // Option 3
// Alias is asign to abc
// Option 3 also can be importing as a grouping into a JS object.
import * as util from "./util.js"; // Then we can get acces to util.apiKey or util.abc- String: Text values
- Number: Positive or negative. With decimal point (float) or without it (integer)
- Boolean: True or false
- Null & undefined:
undifined: where no value is assigned yet.null: Assigned by developer (reset value).
- Objects:
Values should be stores, for that we use variables (for that we use let or const).
Variables are data containers where we store a value in a variable which carries any name of our choice. We assign a name to a variable and we can then use this variable name as an identifier.
[!Note] Identifiers rules and recommendations
- Must not contain whitespace or special characters (except $ and
_).- May contain numbers but must not start with a number.
- Must not clash with reserved keywords.
- Should use camelCasing.
- Should describe what the "thing" it identifies contains or does.
We can perform math:
- Plus
+ - Minus
- - Division
/
Plus is also use for concatenate strings.
Also we have:
- Triple equal
===for checking for equality - Comparison operators
>,<,>=,<=
Functions could be created with function keyword or with the arrow function syntax () => {}.
function createGreeting(userName, message = "Hello!") { // Hello is a default value in case message is not provide.
	console.log(userName);
	console.log(message);
	return "Hi, I am " + userName + ". " + message;
}

const greeting1 = createGreeting('Melissa'); // Calling the function
console.log(greeting1);
[!Hint] Return Statement Functions must only have one return statement at most. Functions without "return" implicitly return "undefined".
| Useful when dealing with anonymous function.
export default (userName, message) => {
console.log("Hello");
return userName + message;
};
[!Important] Syntax shortcuts
- If the arrow functions takes exactly one parameter, we may omit the wrapping parentheses. Instead of
(userName) => { ... }, we useuserName => { ... }.- If the arrow function contains no other logic but a
**return**statement, we may omit the curly braces and thereturnkeyword, like this1. number => number * 3;- If we're trying to return a JavaScript object, the code would need to be adjusted like this:
number => ({ age: number });. By wrapping the object and its curly braces with an extra pair of parentheses, JavaScript understands that the curly braces are not there to define a function body but instead to create an object.
| Can be used to group multiple values together.
const user = {
name: "Meli", // Key: Value
age: 34,

greet() { // Can also store functions, which are calls methods.
console.log("Hello!");
console.log(this.age); // 'this' is used when we are in a method (in a function to belongs to an object), that way we can have acces to the properties of this object.
}

};

console.log(user.name);
user.greet(); // to get access to greet method.
For creating objects, we can created like before or with the special class keyword. With the class keyword,
we can create a blueprint that can then later be used to create the actual objects.
class User { // For class names we start with a capital case character
	constructor(name, age) {
	// Name and age will be store as properties for the object.
	this.name = name;
	this.age = age;
	}
	greet() {
	console.log("Hi!");
	}
}

const user1 = new User("Meli", 33);
console.log(user1);
user1.greet();
You can also use inheritance when using classes:
class Human {
	species = 'human';
}

class Person extends Human {
    name = 'Max';
    printMyName = () => {
        console.log(this.name);
    }
 }

 const person = new Person();
 person.printMyName();
console.log(person.species); // prints 'human'| Arrays are an special kinds of objects.
const hobbies = ["Sports", "Cooking", "Reading"];
console.log(hobbies[0]); // Sports

hobbies.push("Working");
console.log(hobbies); // ["Sports", "Cooking", "Reading", "Working" ];

// Find index will return true if we have the item we are looking for or false, otherwise.
const index = hobbies.findIndex((item) => item === "Sports");
console.log(index); // 0

//// The map method transforms every item in an array into a new item, based on the transformation defined by the function passed as an argument.
const editedHobbies = hobbies.map((item) => ({ text: item }));
console.log(editedHobbies); // Return a new array// Right side create a new array, left side destructure that array.
const [firstName, lastName] = ["Meli", "Diaz"];
// Same to say:
// const userNameData = ["Meli", "Diaz"];
// const firstName = userNameData[0];
// const lastName = userNameData[1];
console.log(firstName); // "Meli"
console.log(lastName); // "Diaz"// Insted of this:
// const name = user.name;
// const age = user.age;
const { name: userName, age } = { // We need to use the field names are defined in the object, but we can define and alias
name: "Meli",
age: 33
};
console.log(userName); // "Meli"
console.log(age); // 33
Instead of:
function storeOrder(order) {
	localStorage.setItem('id', order.id);
	localStorage.setItem('currency', order.currency);
}
We can use destructuring like this:
function storeOrder({id, currency}) { // destructuring
	localStorage.setItem('id', id);
	localStorage.setItem('currency', currency);
}
idandcurrencyare "pulled out" of the incoming object.
| Spread Pulls out values from and array and adds them as separate values to a new array.
const hobbies = ["Sports", "Cooking"];
const newHobbies = ["Reading"];
const mergedHobbies = [...hobbies, ...newHobbies];
console.log(mergedHobbies);
The three dots will pull out all the elements of the array and add them as separate values to the new list.
In objects:
const user = {
name: "Meli",
age: 33
};
const extendedUser = {
isAdmin: true,
...user // Spread 'user' into extendedUser
};
console.log(extendedUser);
Rest converts a list of elements into an array (so we use it for arrays only)
function convertToArray(...asManyArgumentsAsYouWant) {
    return asManyArgumentsAsYouWant;
}
We can use that function like this:
console.log(convertToArray(1, 2, 3)) // yields [1, 2, 3]
console.log(convertToArray('hi', 'everyone')) // yields ['hi', 'everyone']| Compare values, and then execute the code only if the condition is met
const password = prompt("Your password");
if (password === "Hello") {
console.log("Hello works");
} else if (password === "hello") {
console.log("hello works");
} else {
console.log("Access not granted.");
}
promptis a function provide by the browser which will prompt the user for9 input.
const hobbies = ["Sports", "Cooking"];

for (const hobby of hobbies) {
console.log(hobby);
}With React we not manipulate the DOM directly like this:
const list = document.querySelector("ul");
list.remove();
function handleTimeout() { // Option 1
	console.log("Timed out!");
}

const handleTimeout2 = () => { // Option 2
	console.log("Timed out ... again!");
};

setTimeout(handleTimeout, 2000); // Option 1
setTimeout(handleTimeout2, 3000); // Option 2

setTimeout(() => { // Option 3. Anonymous function, directly
console.log("More timing out...");
}, 4000);function init() {
function greet() {
console.log(“Hi!“);
}
greet();
}
init();We are able to define functions inside functions
| We can't edit them
- Strings
- Numbers
- Booleans
| In a variable we don't store the value, we store the address of that value in memory.
- Objects
- Arrays
const message = “Hello”; // Primitive
const hobbies = ["Sports", "Cooking"]; // Reference

// hobbies = []; // This won't work because will be a new array and hobbies is a const.

hobbies.push("Working"); // Mutate the original array
console.log(hobbies);
React projects use a build process where the code write is not the code that gets executed. The code is transform with the help of tools, which can be seen in the package.json file.
React projects use a build process cause:
- Raw, unprocessed react code won't executed in the browser.
- The code would not be optimized for production (e.g not minified)
[!Concept] Minification means that for example, names of variables or functions are shortened to reduce the amount of JS code that's serve to the user.
By default the code we write in react projects would not run in the browser, React projects require a build process that transform our code. So, NodeJS is not just used to install packages with the NPM command or to create projects with the NPX command, but it's also used behind the scenes by that build process.

| Lists all the dependencies of the project.
With npm install we download and install any third party packages needed by the project (when the project has started already).
Components are potentially reusable blocks which we can create and which we them combine to build the overall UI.
React Apps are build by Combining Components.
Note
Any website or app can be broken down into smaller building blocks: Components.
- The idea behind that components are that they wrap HTML, CSS and JS logic that might be needed which together define and control a part of the UI.

React components are just JS functions.
Note
JSX allows us to define the target UI / HTML code right inside our JavaScript code - and therefore right inside our components.
In a Project:
App.jsx- Contain the markup for the content.
- This extension JS Syntax eXtension, is because it is a JS file that uses non-standard JS syntax.
- Browser do not support
.jsx. - Is a React component.
- Must follow two rules:
- Name starts with Uppercase Character and multi-word names should be written in PascalCase.
- Returns "renderable" content (must return a value that can be rendered or "displayed on screen" by react).
- As developer we almost use JSX code exclusively inside of components functions.
- May contain as many nested components as needed (Component tree)
index.jsxcreateRootandrendermethods are responsible for rendering a single root component (App component)
React combines all the JSX code from all those components to generate the overall DOM (the elements that are showing up on the screen).
The convention is to give those files the same name as the component name of the component that will be stored in that file and then the .jsx extension since it will have JSX code in there.
- To make sure we can use the component into another we need to import/export.
- It could be exported as named export like this:
export function Header() {
///
}
It this case, import have to be with
{}
or as default export:
export default function Header() {
// ...
}
In this case import will be:
import Header from './components/Header';
Note
By default, React will only execute a component function once.
In CSS files, typically this are added with the components and are imported in the component file.
import './Header.css';Note
CSS file in a Component file will not scope these styles to that Component.
For output data to be displayed we need to wrap it with curly braces.
<p>{data}</p>If statements, for-loops, function definitions and other block statements are not allowed here. Only expressions that directly produce a value.
As part of the deployment process the code will be transform, and optimized, so we should use and import statement.
import reactImg from './assets/react-core-concepts.png';

// ...

<img src={reactImg} alt="Stylized atom" />
At the end
reactImgis a JS object.
Note
- We can store images in the
public/folder and then directly reference them from inside yourindex.htmlorindex.cssfiles. - Any files (of any format) stored in
src(or subfolders likesrc/assets/) are not made available to the public. - Files stored in
src/(and subfolders) can be used in our code files. Images imported into code files are then picked up by the underlying build process, potentially optimized, and kind of "injected" into thepublic/folder right before serving the website. - We should use the
public/folder for any images that should not be handled by the build process and that should be generally available like images are used directly in theindex.htmlfile or favicons. - Images that are used inside of components should typically be stored in the
src/folder (e.g., insrc/assets/).
Being able to pass data into components.
Every custom components will receive props
<CoreConcept title="Components" image={componentsImg} />tittle and image we call it 'prop'.
- We can pass all kind of data: String, number, objects, arrays (any valid JS expression).
- We can set dynamic values with the sane syntax we use in JSX, curly braces
{} - The function/component only will receive one parameter, typically call
props. - The value that will be pass as a parameter will be an object that has all the key-value pairs or custom attributes pass to the component.
function CoreConcept(props) {
return (
<li>
{/* The same name of the custom attributes has to be the same name of the key, in this case 'props.image' */}
<img src={props.image} alt="..." />
{/* ... */}
)}
Alternative to props.image, we can use object destructuring as alternative:
function CoreConcept({ image }) { // Use the same property names was defined as props
  return (
    <li>
      <img src={image} alt="..." />
      {/* ... */}
    </li>
  )
}- we can use the spread operator to spill out all the key-value pairs of the object, if:
export const CORE_CONCEPTS = [
{
image: componentsImg,
title: 'Components',
description:
'The core UI building block - compose the user interface by combining multiple components.',
},
// ...
];<CoreConcept {...CORE_CONCEPTS[0]} />- if a component is used like this:
<CoreConcept
  title={CORE_CONCEPTS[0].title}
  description={CORE_CONCEPTS[0].description}
  image={CORE_CONCEPTS[0].image} />
We could group the received props into a single object like this:
export default function CoreConcept({ ...concept }) {
  // ...concept groups multiple values into a single object
  // Use concept.title, concept.description etc.
  // Or we can destructure the concept object: const { title, description, image } = concept;
}- Also, we can set a default value, in case some prop is not passed:
export default function Button({ caption, type = "submit" }) {
  // caption has no default value, type has a default value of "submit"
}
This can easily be achieved since JavaScript supports default values when using object destructuring
<TabButton>Components</TabButton>Content inside custom components will be ignored by React by default.
There is one prop that is always get by default, the special built-in children prop.
children prop is a prop that's set by React and it's a prop that's not set with help of attributes.
export default function TabButton(props) { // Could be {children}, as well
  return <li>
    <button>{props.children}</button>
    {/* <button>{children}</button>  */}
  </li>
}
children.propcontains whichever content we have between our component tags (some text or some JSX structure).

- Having a single component that deals with different things typically is a sign that we might need to split it.
- Putting different features into different Components is a good idea
- If we use a state that makes the app re-render and affects other components, we might need to split it.
Note
Split our code across multiple components can make working on that project easier.
==Whenever we are using or reusing a component, React will create a new isolated instance==
When we are setting props (attributes) on a custom component those props are not automatically forwarded to the JSX use inside that component.
Props must be used & set explicitly
For that, we can use rest operator ... and then any identifier of our choice.
// Examples.jsx

//...
return (
	<Section title="Examples" id="examples">
	{/* ... */}
	</Section>
)
// Section.jsx
export default function Section({ title, children, ...props }) { // ... Alow to group multiple props
return (
// ... allow us to pass all the props to the section
<section {...props}>
<h2>{title}</h2>
{children}
</section>
)
}This is useful when building wrapper component as Section.
We can set multiple slots:
// Tabs.tsx
import React from 'react';
// Define a Tabs component with two slots: children and buttons
export default function Tabs({ children, buttons }) {
  return (
     <>
      <menu>
        {buttons}
      </menu>
      <div id="tab-content">
        {children}
      </div>
    </>
  );
}
These props allow us to pass different React nodes to be rendered in distinct parts of the component. The
menuelement renders thebuttonsprop, and the main content area renders thechildrenprop.
// Examples.tsx
import React, { useState } from 'react';
import Tabs from './Tabs';

export default function Examples() {
  const [selectedTopic, setSelectedTopic] = useState('components');

  // Function to handle tab selection
  const handleSelect = (topic) => {
    setSelectedTopic(topic);
  };

  // Content corresponding to each tab
  const tabContent = <div>{/* Render content based on selectedTopic */}</div>;

  return (
    <Section title="Examples" id="examples">
      <Tabs
        buttons={
          <>
            <TabButton isSelected={selectedTopic === 'components'} onClick={() => handleSelect('components')}>
              Components
            </TabButton>
            <TabButton isSelected={selectedTopic === 'jsx'} onClick={() => handleSelect('jsx')}>
              JSX
            </TabButton>
            <TabButton isSelected={selectedTopic === 'props'} onClick={() => handleSelect('props')}>
              Props
            </TabButton>
            <TabButton isSelected={selectedTopic === 'state'} onClick={() => handleSelect('state')}>
              State
            </TabButton>
          </>
        }
      >
        {tabContent}
      </Tabs>
    </Section>
  );
}
This pattern provides a flexible way to build UI components that require distinct sections with varying content, promoting reusability and clean separation of concerns.
In React, we can use an element identifier as a value for a component's prop. This pattern allows us to dynamically choose which element or component should be used for rendering.
// Using a built-in element as a string identifier
<Tabs buttonsContainer="menu">
  {/* ... */}
</Tabs>

// Using a custom component as a dynamic value
<Tabs buttonsContainer={CustomComponent}>
  {/* ... */}
</Tabs>
For built-in elements like menu or div we pass the identifier as string. For Custom components we must be passed as a "dynamic" value:
{CustomComponent}.
For implementation:
// Tabs.js or Tabs.jsx
import React from 'react';

// export default function Tabs({ ButtonsContainer }) {
export default function Tabs({ ButtonsContainer }) {
  // The identifier must be a capitalized variable to be used as a component
  // const ButtonsContainer = buttonsContainer;
  // Without const, another way is dynamically set buttonsContainer with uppercase chararecter at the starts.

  return (
    <>
      <ButtonsContainer>
        {/* Additional content or elements go here */}
      </ButtonsContainer>
    </>
  );
}
With that react will look for a custom or built-in element as a wrapper for that element. This way we're able to dynamically set the wrapper that should be used around an specific element.
We can set default prop values in React by providing default values.
export default function Tabs({ children, buttons, ButtonsContainer = 'menu' }) {
	//...
}
If no value is passed for the
ButtonsContainerprop, it defaults to'menu'.
The value for this onClick prop is a function.
export default function TabButton({ children }) {
  function handleClick() {
    console.log('clicked');
  }

  return <li>
    {/* handleClick must not be executed (not called), it is called only when the button is clicked */}
    <button onClick={handleClick} >{children}</button>
  </li>
}```

### Passing functions as Values to Props

We also can a function between components.

```jsx
// App.jsx
function App() {
  function handleSelect () {
    console.log('selected');
  }
// ...
<TabButton onSelect={handleSelect}>Components</TabButton>
}
// TabButton.jsx
export default function TabButton({ children, onSelect }) {
return <li>
<button onClick={onSelect} >{children}</button>
</li>
}When the button is click
handleSelectwill be triggered.
We can "configure" the execution of an event-dependent function, by wrapping the execution of our event handling function with another function:
<TabButton onSelect={() => handleSelect()}>...</TabButton>Now we can control
handleSelectand how this is executed.
| Give our components the ability to remember things.
- States are the way to tell React that a component function should be executed again.
- The concept of state involves registering variables that are managed by React and updated with the help of a function provided by React, which will cause React to update the UI.
- These states are called React Hooks.
- React hooks must only be called inside of React component functions or inside of other React Hooks.
[!NOTE] Rules of Hooks
- Only call Hooks inside of Component Functions
- Only call Hooks on the top level
For useState:
import { useState } from 'react';

function App() {
  const [selectedTopic, setSelectedTopic] = useState('Please click a button'); // It must be called on the top level
  // ...
}
For set a new value, we can do it like this:
function App() {
  const [selectedTopic, setSelectedTopic] = useState('Please click a button');
  function handleSelect (selectedButton) {
    setSelectedTopic(selectedButton);
    console.log(selectedTopic);
  }
When we call
setSelectedTopic, React "schedules" the state, so the update value will only be available after the app component function executed again.
Note
In React, when we are updating the state based on the previous value of that state, we should not do it like:
setIsEditing(!isEditing);
Instead, when updating the state based on the previous value of that state, we should pass a function to that state updating function:
setIsEditing( wasEditing => !wasEditing)
This function will be call by React and it will automatically get the current state value, at the point of time where this scheduled update is executed.
// A function that can return a cleanup function. Accepts a function that contains imperative, possibly effectful code
 useEffect(() => {
  }, [])
Is important to add a list of dependencies for less useEffect. We provide this as a list (as an array), if this is present, effect will only activate if the values of the list change.
- If we provide and empty array we say that the effect is execute once, only.
  useEffect(() => {
    fetch('http://localhost:3000/heroes').then(res => {
      return res.json(); // parses JSON response into native JavaScript objects
    }).then(data => { // This is where we get access to the data inside our response.
      setHeroes(data); // Replace the empty heroes array with the data we get from the server
    })

    // Cleanup function
    return () => {

    }
  }, [])  // useEffect will be called twice in development mode: once when the component mounts and once when it unmounts. This helps prevent bugs inside a useEffect.
To prevent useEffect from calling twice and, in this case, fetching data twice, we can use a useRef hook.
export default function App() {
  const fetched = useRef(false);

  useEffect(() => {
    if(!fetched.current) {
      fetch('http://localhost:3000/heroes').then(res => {
      return res.json();
    }).then(data => {
      setHeroes(data);
    });

    fetched.current = true; // This way we prevent useEffect from fetching the same data twice.
    }
    return () => {
    }
  }, [])
useRefreturn a mutable ref object, that will persist for the full lifetime of the component.
Once we fetch data, what we usually have in an applications is routing, with react we need a third party package for that.
npm i react-router-dom- Refs in React are special values managed by React, similar to state or variables.
- They allow you to access and interact with DOM elements directly.
- Refs are typically stored in a constant or variable and named according to their purpose (e.g.,
inputorplayerName). - They are useful for scenarios where you need to read values from input fields without logging every keystroke.
import { useRef, useState } from "react";

export default function Player() {
  const playerName = useRef(null);
  const [enteredPlayerName, setEnteredPlayerName] = useState('Unknown');

  function handleClick() {
    // Access all methods and properties of the DOM element using the current property
    setEnteredPlayerName(playerName.current.value);
    playerName.current.value = ''; // React is not about manipulating the DOM. So it must be use with care.
  }

  return (
    <section id="player">
      {/* ?? operator returns enteredPlayerName if it's not null or undefined, otherwise 'unknown' */}
      <h2>Welcome {enteredPlayerName ?? 'unknown'} </h2>
      <p>
        {/* The ref prop allows us to access the DOM element directly */}
        <input type="text" ref={playerName} />
        <button onClick={handleClick}>Set Name</button>
      </p>
    </section>
  );
}
Avoid overusing refs for reading and manipulating various page values, as it can lead to a codebase that contradicts React’s principles.
==Whenever a ref changes, the component function does not re-execute.==

- When we use
useRef, React stores the values behind the scenes and ensures they don't get lost if the component function re-executes. - Using refs avoids unnecessary re-renders, improving performance when the timer state does not need to trigger UI updates.
import { useState, useRef } from 'react';

// let timer; // Using a variable to store the timer ID is not recommended as it will be shared across all component instances, leading to unexpected behavior.

export default function TimerChallenge({ title, targetTime }) {
  const [timerStarted, setTimerStarted] = useState(false);
  const [timerExpired, setTimerExpired] = useState(false);

  const timer = useRef(); // It will be a component instance specific since this is defined inside of the component.

  // Every component instance of this TimerChallenge component will get its own timer ref that works totally independent from the other refs that belong to the other instances of that component.


  function handleStart() {
    timer.current = setTimeout(() => {
      setTimerExpired(true);
    }, targetTime * 1000);
    setTimerStarted(true);
  }

  function handleStop() {
    // ClearTimeout(); from js allow us to stop the timer. It needs a pointer to stop the timer
    clearTimeout(timer.current);
  }

  return (
    <section className="challenge">
      <h2>{title}</h2>
      {timerExpired && <p>You lost!</p>}
      <p className="challenge-time">
        {targetTime} second{targetTime === 1 ? '' : 's'}
      </p>
      <p>
        <button onClick={timerStarted ? handleStop : handleStart}>{timerStarted ? 'Stop' : 'Start'} Challenge</button>
      </p>
      <p className={timerStarted ? 'active' : undefined}>
        {timerStarted ? 'Time is running' : 'Timer inactive'}
      </p>
    </section>
  )
}
useRefcreates a component instance-specific reference, allowing each instance of theTimerChallengecomponent to have its own timer that works independently.
With JSX:
  if (isEditing) {
    // value={name} overwrites the value of the input
    // defaultValue={name} set an initial value
    playerName = <input type="text" required defaultValue={name} />
    // value alow us to set the value of the input
  }
defaultValueis a way of change the input but the value is not updating, when is needed.
A better way to updated the value is using State:
import { useState } from "react";
export default function Player({ initialName, symbol }) {

  const [playerName, setPlayerName] = useState(initialName);
  const [isEditing, setIsEditing] = useState(false);

  const handleEditClick = () => {
    setIsEditing(editing => !editing);
  }

  function handleNameChange(event) {
    // React will give an event object as an argument to the function
    setPlayerName(event.target.value);
  }

  let editablePlayerName = <span className="player-name">{playerName}</span>

  if (isEditing) {
    // value={name} alow us to set the value of the input and overwrites the value of the input
    // defaultValue={name} set an initial value
    editablePlayerName = <input type="text" required value={playerName} onChange={handleNameChange} />
    // The way of listening for changes in the input is called two-way binding because we're getting a value out of the input and feeding a value back into the input.
  }


  return (
    <><li>
      <span className="player">
        {editablePlayerName}
        <span className="player-symbol">{symbol}</span>
      </span>
      <button onClick={() => handleEditClick()}>{isEditing ? "Save" : "Edit"}</button>
    </li>
    </>
  )
}Note
It's strongly recommended that if our state is an object or array, we update that state in an immutable way, which means create a copy of the old state, and then that copy instead.
import { useState } from "react";

const initialGameBoard = [[null, null, null], [null, null, null], [null, null, null]];

export default function GameBoard() {

  const [gameBoard, setGameBoard] = useState(initialGameBoard);

  function handleSelectSquare(rowIndex, colIndex) {
    setGameBoard(prevGameBoard => {
      const updateBoard = [...prevGameBoard.map(innerArray => [...innerArray])]; // This is a deep copy of the array
      updateBoard[rowIndex][colIndex] = "X";
      return updateBoard;
    })
  }

  return (
    <ol id="game-board">
      {gameBoard.map((row, rowIndex) => <li key={rowIndex}><ol>
        {row.map((playerSymbol, colIndex) =>
          <li key={colIndex}>
            <button onClick={() => handleSelectSquare(rowIndex, colIndex)}>{playerSymbol}</button>
          </li>)}
      </ol></li>)}
    </ol>
  )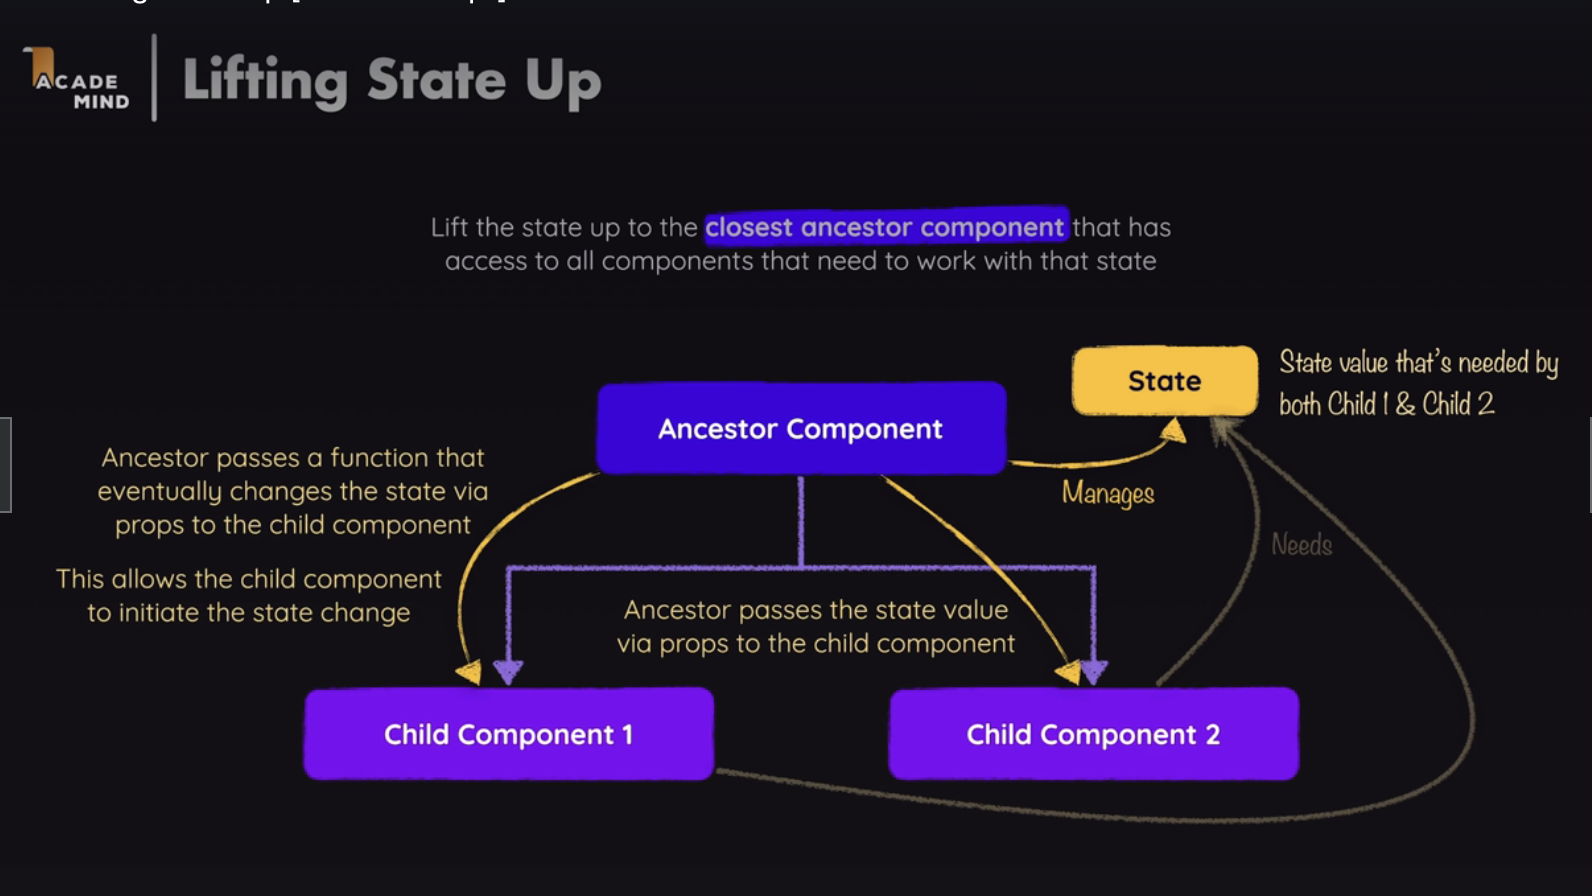
}It consist in lift the state up to the closest ancestor component that has access to all components that need to work with that state.
When we produce some computed value that is derived from some state.
Note
We should manage as little state as needed and try to derive as much information and as many values as possible from that state.
When we need to centralized states, because we are in a situation where our components are no longer children of a parent component, we use React Context.
We can output content conditionally with React.
 <div id="tab-content">
	{!selectedTopic ? (
	  <p>Please select a topic.</p>
	) : (<>
	  <h3>{EXAMPLES[selectedTopic].title}</h3>
	  <p>{EXAMPLES[selectedTopic].description}</p>
	  <pre>
		<code>{EXAMPLES[selectedTopic].code}</code>
	  </pre>
	</>
	)}
</div>
As alternative:
 let tabContent = <p>Please select a topic.</p>

  if (selectedTopic) {
    tabContent = <>
      <h3>{EXAMPLES[selectedTopic].title}</h3>
      <p>{EXAMPLES[selectedTopic].description}</p>
      <pre>
        <code>{EXAMPLES[selectedTopic].code}</code>
      </pre>
    </>
  }

// ...

<div id="tab-content">
	{tabContent}
</div>
JSX code can be store in a variable.
In React we can set a class with the className prop.
JSX is capable of dealing with arrays of renderable data but it is not able to output JS objects.
So we need to transform the array of objects in an array of JSX elements,
Instead:
<section id='core-concepts'>
  <h2>Time to get started!</h2>
  <ul>
	<CoreConcept {...CORE_CONCEPTS[0]} />
	<CoreConcept {...CORE_CONCEPTS[1]} />
	<CoreConcept {...CORE_CONCEPTS[2]} />
	<CoreConcept {...CORE_CONCEPTS[3]} />
  </ul>
</section>
We can write it like this:
<section id='core-concepts'>
  <h2>Time to get started!</h2>
  <ul>
	{CORE_CONCEPTS.map(conceptItem =>
	  <CoreConcept key={conceptItem.title} {...concept} />
	)}
  </ul>
</section>
Since each child in a list should have an unique "key" prop, we need to add this special prop. Under the hood, it's used by React to efficiently render and update the list.
Note
When dynamically outputting a list of elements, every element should receive a unique "key" to help React tell the list items apart.
Since we can't return 2 values in a normal function, we can not return 2 values in JSX code,, thats the reason we have in React a special fragment component <> </> which can be use, as alternative to wrapping elements.
import { Fragment } from 'react'; // older projects
//...

function App() {
	return (
		// <Fragment>
		<>
		{/* ... */}
		</>
		// </Fragment>
	);
}
By using a fragment instead of
<div></div>, we will not generate extra unnecessary div elements in the DOM. Instead of fragment newest project just need an empty tag.
Note
A JSX value must have only one root element.
Note
API stands for "Application Programming Interface", and a REST API is a web server that exposes certain pre-defined routes to which HTTP requests can be sent.
- Vite will create a React kind of project.
npm create vite@latest
cd name-of-the-project
Install a developer dependency of Tailwind, postcss and autoprefixer
npm install -D tailwindcss postcss autoprefixer
npx tailwindcss init -p- Tailwind set-up
// tailwind.config.js

/** @type {import('tailwindcss').Config} */
export default {
  content: [
    "./index.html",
    "./src/**/*.{js,ts,jsx,tsx}",
  ],
  theme: {
    extend: {},
  },
  plugins: [],
}
/* index.css */
@tailwind base;
@tailwind components;
@tailwind utilities;- Then run:
npm run devThe JSON server is going to do all the hard work. It's going to take the JSON file that we have and give us the API endpoints to get post, put and delete the elements inside that JSON file and give us those API endpoints.
> npm i json-server
> npx json-server ***.json
npxjson-server following with the location of the JSON file.
To set up routing in React, you can use the react-router-dom package.
npm i react-router-domSet up the routes:
//main.tsx
import React from 'react'
import ReactDOM from 'react-dom';
import App from './App';
import './index.css'
import { createBrowserRouter, Navigate, RouterProvider } from 'react-router-dom';
import Dashboard from './components/Dashboard';
import HeroesList from './components/HeroesList';

// Here we define the routes
const router = createBrowserRouter([
  {
    path: '/',
    element: <App />,
    // Children elements that will be rendered with outlet.
    children: [
      {index: true, element: <Navigate replace to="/dashboard" /> },
      { path: '/dashboard', element: <Dashboard /> },
      { path: '/heroes', element: <HeroesList /> },
    ]
  }
])

ReactDOM.createRoot(document.getElementById('root')!).render(
  <React.StrictMode>
    {/* <App /> */}
    <RouterProvider router={router} />
  </React.StrictMode>,
)
Inside our roots inside the
main.tswe have our root element which is the app component.
And, we need to ensure our App component renders the child routes:
// App.tsx
import { Outlet } from "react-router-dom";

export default function App() {
  return (
    <div className="mt-5 container mx-auto flex justify-between gap-6">
      <div>
        {/* Outlet will be responsible for rendering the child routes element if there is any */}
        <Outlet />
      </div>
    </div>
  )
}
In
Appcomponent is where our children get rendered
StrictModeis a built-in React component that can be wrapped around other components.- Typically used in
Index.jsxaround the rootAppcomponent but can be applied to specific components for targeted error checking. - Helps catch issues by double-executing components, highlighting errors like unintentional side effects or incorrect state handling.
- Using
StrictModesurfaces errors immediately, without needing user interaction.
- When writing code that runs in the browser, all our React application code runs in the browsers of our visitors. So our visitors can access that code and they can view that code.
- Not all operations can be performed in the browser.
- A central server or backend is essential for apps where multiple users need to share data.
- A backend server acts as an intermediary between the React app and the database.
- Backend code is protected from users, ensuring secure data handling.
- To connect frontend with the backend we use HTTP Request.
- The backend server exposes endpoints to control allowed requests and ensure security.
- Separate projects are common for frontend (React app) and backend.
- Different languages (e.g., JavaScript, PHP, C#) can be used for the backend.
- Frameworks like Next.js or Remix allow blending frontend and backend.
import Places from './Places.jsx';

export default function AvailablePlaces({ onSelectPlace }) {
  const [availablePlaces, setAvailablePlaces] = useState([]);

  // Fetch will send a get request to the URL
  fetch('http://localhost:3000/places').then((res) => {
    if (res.ok) {
      return res.json(); // json is the facto standard data format for exchanging data with the backend.
    }
  }).then((data) => {
    setAvailablePlaces(data.places) // This will create an infinite loop, since we are using state, which will re-render the component.
  })

  return (
    <Places
      title="Available Places"
      places={[]}
      fallbackText="No places available."
      onSelectPlace={onSelectPlace}
    />
  );
}
The infinity loop fix, wrapping the code into a useEffect.
#Resources
map()=> https://developer.mozilla.org/en-US/docs/Web/JavaScript/Reference/Global_Objects/Array/mapfind()=> https://developer.mozilla.org/en-US/docs/Web/JavaScript/Reference/Global_Objects/Array/findfindIndex()=> https://developer.mozilla.org/en-US/docs/Web/JavaScript/Reference/Global_Objects/Array/findIndexfilter()=> https://developer.mozilla.org/en-US/docs/Web/JavaScript/Reference/Global_Objects/Array/filterreduce()=> https://developer.mozilla.org/en-US/docs/Web/JavaScript/Reference/Global_Objects/Array/Reduce?v=bconcat()=> https://developer.mozilla.org/en-US/docs/Web/JavaScript/Reference/Global_Objects/Array/concat?v=bslice()=> https://developer.mozilla.org/en-US/docs/Web/JavaScript/Reference/Global_Objects/Array/slicesplice()=> https://developer.mozilla.org/en-US/docs/Web/JavaScript/Reference/Global_Objects/Array/splice