Carna provides classes for simple and fast visualization of CT data. It is named after the greek god of organs (yup, they really did have even one for organs). It is based on OpenGL 3.3 and Eigen 3.
This package provides auxiliary classes for using Carna ≥3.0.0 with Qt ≥4.8.
Go to: Library Documentation
Provided classes:
- The
qt::DRRControldefines a widget that controlspresets::DRRparameters. - The
qt::DVRControlcontrols lighting and colormap forpresets::DVRvolume renderings. - The
qt::MIPControlimplements a widget that allows to manage thepresets::MIPLayerobjects of anpresets::MIPStageinstance. - The
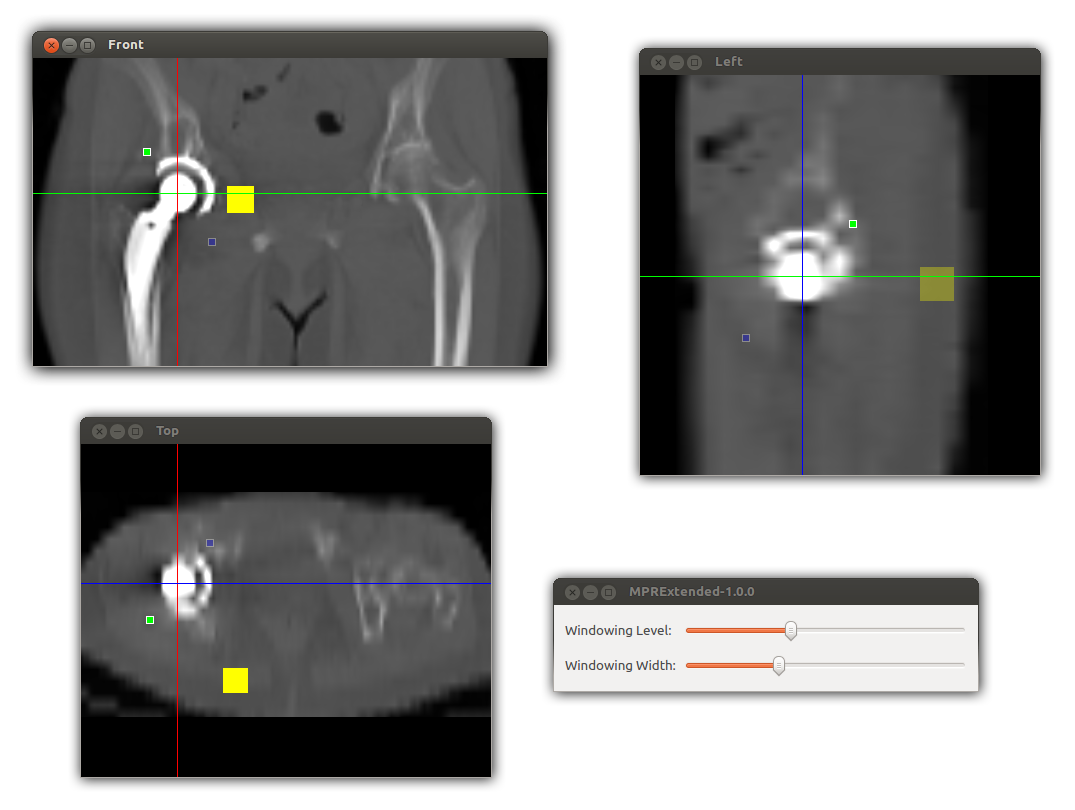
qt::MPRandqt::MPRDisplayclasses implement multiplanar reformats. - The
qt::WindowingControldefines a widget that controls the HU windowing of diverse other components. - The
qt::Displaywidget provides abase::GLContextobject and encapsulates abase::FrameRendererthat it uses for rendering itself. - The
qt::ColorPickerandqt::WideColorPickerwidgets let the user choose colors. - The widget
qt::ExpandableGroupBoxis a container that can hide its contents in order to save UI space. - The
qt::SpatialListModelcan be used withQComboBoxfor example to let the user choosebase::Spatialobjects from a list.
- Qt5 or Qt4.8
- Eigen ≥ 3.0.5
- OpenGL 3.3
- GLEW ≥ 1.7
Compilation process has been tested with following tool chains:
- GCC 4.9: is known to be fully supported.
- Visual Studio 2010 is known to be fully supported.
The default build process requires CMake ≥ 3.0.2.
This section explains three ways of building Carna:
- Creating Visual Studio project files and building it from the IDE
- Building Carna directly through CMake from command line
- If you are a colleague from MediTEC, you can use the batch script.
- On Linux you can run the
linux_build.shscript.
Regardless which build method you pick, first thing you need to do is to fetch the latest stable version. If you are using git from command line, you can simply run following command from within the directory where you want to download the sources:
git clone https://github.com/RWTHmediTEC/CarnaQt.gitAfter a few seconds there should be a new folder named CarnaQt
at your current working directory.
First create the directory where the Visual Studio files should go to:
cd CarnaQt

mkdir build
mkdir build\VisualStudio2010

cd build\VisualStudio2010
Then initialize the Visual Studio environment:
call "%VS100COMNTOOLS%\vsvars32.bat"And finally invoke CMake like this:
cmake -G"Visual Studio 10" -DCMAKE_INSTALL_PREFIX="C:\Libs" ..\..You may also leave out the -DCMAKE_INSTALL_PREFIX parameter
if you do not want to specify any particular installation directory.
In this case the default installation directory will be set,
which is the value of the environmental variable %ProgramFiles% on Windows.
At this point the Visual Studio project files are ready.
You can proceed by opening the solution file CarnaQt.sln
that was created in Carna\build\VisualStudio2010.
Note that building the INSTALL project from the solution
actually triggers the installation routine
to the destination you configured via -DCMAKE_INSTALL_PREFIX.
The first step is to create the directories where the results of the building process will be stored. You can use any names you like for the directories, it's only important to distinguish between "debug" and "release" files:
cd CarnaQt

mkdir build
mkdir build\debug
mkdir build\release
Then initialize the building environment. Use the command below if you are going to use Visual Studio for compilation:
call "%VS100COMNTOOLS%\vsvars32.bat"Now it's time to run the build process. Lets build the "debug" version first:
cd build\debug
cmake -G"NMake Makefiles" -DCMAKE_INSTALL_PREFIX="C:\Libs" -DBUILD_DOC=OFF ..\..
nmake
You may also leave out the -DCMAKE_INSTALL_PREFIX parameter
if you do not want to specify any particular installation directory.
In this case the default installation directory will be set,
which is the value of the environmental variable %ProgramFiles% on Windows.
The parameter -DBUILD_DOC=OFF forces CMake to skip running Doxygen, if it is installed at all. The idea is to build the documentation only once. Since we are going to build the "release" version next, leaving out this parameter at this point would lead to Doxygen being triggered twice.
Run nmake install now if you wish to install the "debug" version on your system.
If everything went well, run the build for the "release" version:
cd ..\nmake_release
cmake -G"NMake Makefiles" -DCMAKE_BUILD_TYPE=Release ..\..
nmake
Run nmake install (again) if you want to install the "release" version.
You may need finer control of the installation routines' destinations.
Regardless which of the methods presented above you choose,
you can specify the destinations for the
headers, the library and the generated CMake files
by passing particular parameters to cmake:
INSTALL_CMAKE_DIRspecifies where theFindCarnaQt.cmakefile goes to.INSTALL_LIBRARY_DIRspecifies where the built binary files go to.INSTALL_HEADERS_DIRspecifies where the headers are going to installed to.INSTALL_DOC_DIRspecifies where the HTML documentation is going to be installed.
If you use relative paths for these parameters,
they will be resolved relatively to CMAKE_INSTALL_PREFIX.
Consider using absolute paths if you don't want that.
Make sure you have the environmental variable %MEDITEC_LIBS% set
and it is poiting to an existing directory that you have permissions to write to,
than
- run
create_msvc10_project.batto create the Visual Studio project files, or - run
win32_msvc10_build.batto build and install the whole package.
It is assumed at this point that you either have built and installed Carna with CMake, or you have fetched the binaries and the corresponding headers from somewhere.
Add a find_package directive to your project's CMakeLists.txt file, e.g.:
find_package( CarnaQt REQUIRED )
include_directories( ${CARNAQT_INCLUDE_DIR} )
If you need to put a constraint on the version, use find_package(CarnaQt 1.0.0 REQUIRED)
to pick a package with a version compatible to 1.0.0,
or use find_package(CarnaQt 1.0.0 EXACT REQUIRED) to pick a package by the exact version.
You also need to add the headers from Eigen and Carna:
# Eigen
find_package( Eigen3 3.0.5 REQUIRED )
include_directories( ${EIGEN3_INCLUDE_DIR} )

# Carna
find_package( Carna 3.0.0 REQUIRED )
include_directories( ${CARNA_INCLUDE_DIR} )
Finally add Carna and CarnaQt to the linking stage:
target_link_libraries( ${TARGET_NAME} ${SOME_OTHER_LIBRARIES} ${CARNA_LIBRARIES} ${CARNAQT_LIBRARIES} )This method relies on CMake being able to locate the proper FindCarna.cmake and FindCarnaQt.cmake files.
If you've built Carna and CarnaQt from source,
than you have determined its location either through CMAKE_INSTALL_PREFIX
or INSTALL_CMAKE_DIR as described in "installation notes".
You can specify the paths CMake searches for FindCarna.cmake and FindCarnaQt.cmake by adjusting the
CMAKE_MODULE_PATH variable, e.g.:
list( APPEND CMAKE_MODULE_PATH "C:/CMake/Modules" )If you are a colleague from MediTEC, you must also add the following two lines of code
before find_package, otherwise CMake will not find Carna and CarnaQt:
list(APPEND CMAKE_MODULE_PATH "${MEDITEC_LIBS}/Carna/3.0")
list(APPEND CMAKE_MODULE_PATH "${MEDITEC_LIBS}/CarnaQt/1.0")Find where your header files are located. You might look for qt/CarnaQt.h or qt/Version.h.
Both of these files are contained by a directory named Carna.
Add the parent directory of the Carna directory,
that contains qt/CarnaQt.h and qt/Version.h in turn,
to your project's include directories.
Then find the appropriate library file.
It's name depends on your platform and CarnaQt version,
e.g. CarnaQt-1.0.0.lib for the release and CarnaQt-1.0.0d.lib
for the debug version respectively of CarnaQt 1.0.0 on Windows.
Add both of these files to your project's linking stage.
Note that you must also add the header and library files from Carna.