The Job Listing Platform is a web-based application designed to connect job seekers and employers. It allows employers to post jobs while job seekers can search for jobs, apply for listings and upload their resume. Both users can manage their profiles.
- Job Search: Search for jobs based on location, salary range, and job type.
- Job Application: Apply for jobs directly from the platform and Get a list of jobs they have applied for and its application status.
- Notifications: Receive realtime notifications for job matches and updates.
- Post Jobs: Create and post new job listings, specifying job title, location, description, and qualifications.
- Manage Jobs: View and manage all posted jobs, including updating job details or closing listings.
- View Applications: Access job applications, review cover letters and resumes, and track application statuses.
- Job Application Management: Ability to track and manage job applications, including their status (applied, reviewed, interviewed, offered, rejected).
- Notifications: Receive realtime notifications for job applications and updates.
- User Authentication: Secure user registration and login system.
- Profile Management: Create and update user profiles with personal data.
- Backend:
- Node.js with Express.js
- MongoDB with Mongoose (NoSQL database)
- JWT for authentication
- Mega for media storage (for resumes)
Before you begin, ensure you have the following installed on your machine:
Fork this repository by clicking on the fork button on the top of this page. This will create a copy of this repository in your account.
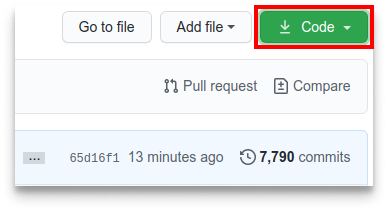
Now clone the forked repository to your machine. Go to your GitHub account, open the forked repository, click on the code button and then click the copy to clipboard icon.
Open a terminal and run the following git command:
git clone "url you just copied"where "url you just copied" (without the quotation marks) is the url to this repository (your fork of this project). See the previous steps to obtain the url.

For example:
git clone git@github.com:this-is-you/job-board-api.gitwhere this-is-you is your GitHub username. Here you're copying the contents of the first-contributions repository on GitHub to your computer.
Change to the repository directory on your computer (if you are not already there):
cd job-board-apiNow create a branch using the git switch command:
git switch -c your-new-branch-nameFor example:
git switch -c add-alonzo-church console.logis not allowed
a default logger has been created
  import log from "./utils/logger";

  log.info("information")
Make your changes to the codebase. Ensure your code follows the project's coding standards and guidelines.
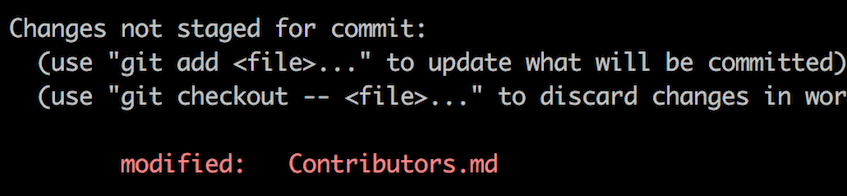
If you go to the project directory and execute the command git status, you'll see there are changes.
Add those changes to the branch you just created using the git add command:
Push your changes using the command git push:
git push -u origin your-branch-namereplacing your-branch-name with the name of the branch you created earlier.
If you get any errors while pushing, click here:
-
remote: Support for password authentication was removed on August 13, 2021. Please use a personal access token instead.
remote: Please see https://github.blog/2020-12-15-token-authentication-requirements-for-git-operations/ for more information.
fatal: Authentication failed for 'https://github.com//first-contributions.git/'
Go to GitHub's tutorial on generating and configuring an SSH key to your account.
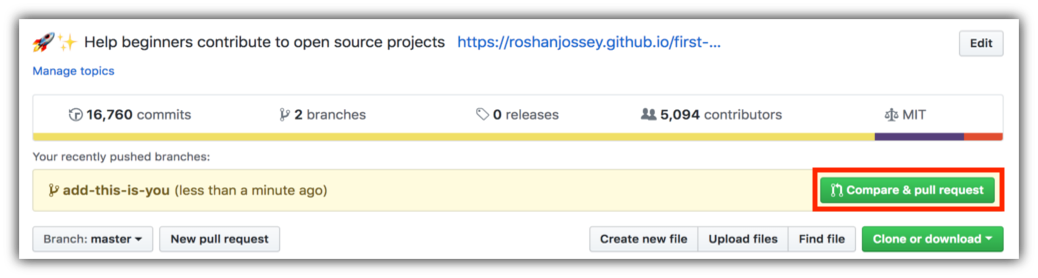
If you go to your repository on GitHub, you'll see a Compare & pull request button. Click on that button.
Now submit the pull request.

Soon your changes will be merged into the staging branch of this project. You will get a notification email once the changes have been merged.
First, clone the repository to your local machine using Git.
git clone https://github.com/your-username/[app-name].git
cd [app-name]Navigate to the project directory and install the required dependencies.
yarnCreate a .env file in the root directory of the project and add your environment-specific variables. You can use the provided .env.example file as a reference.
cp .env.example .envEdit the .env file to match your environment configuration.
Start the development server with the following command. This will also watch for any changes in your code and automatically restart the server.
yarn start:devTo run the application in a production environment, use the following command:
yarn startOpen your browser and navigate to http://localhost:8080 to verify that the application is running correctly.
All API endpoints can be referenced in the API Reference document.
This project is versioned to ensure backward compatibility and easy maintenance. The current version is [version 1].
all routes should have a prefix of
api/v1