
![]()
Atyalpa is a lightweight PHP framework designed specifically for HTTP REST API use. "Atyalpa" is a sanskrit word meaning "tiny". Motivation behind atyalpa is to bind some of the best packages from PHP community to handle HTTP requests and responses.
The framework only offers a way to pass HTTP request to your controllers and send back response from controller to the web. The rest part like caching, authentication is upto you. Don't worry. There are already amazing packages available for you to use without having to reinvent the wheel. What you get from Atyalpa is an opportunity of being picky.
- Atyalpa
- PHP 8.3 or higher
- Composer
To install atyalpa use composer:
composer create-project atyalpa/atyalpa example-projectThe very first thing is creating a .env file. Atyalpa comes with an example env file .env.example. To quickly get started, simply create a new .env file and copy the content of .env.example to it.
cp .env.example .envSince .env will contain configurations like database credentials or any sensitive data, it's a best practice to keep it in .gitignore and create a new env file on the server during deployment.
Behind the scene, atyalpa is using ReactPHP's HTTP server to serve HTTP requests. To run the server, use the command:
php public/index.phpNote: To run the server, it needs APP_URL and APP_PORT configured in .env. You can set them to 127.0.0.1 and 8080 respectively. But you are free to choose any IP and port. You can find the default configurations in .env.example file.
An entry point to the application is public/index.php. It's where the ReactPHP's server runs. The request is handled by ReactPHP and then passed to Atyalpa's Application class. The Application class is instantiated from bootstrap/app.php file and then used inside public/index.php. The request is then handled by the handle() method from Application class.
Behind the scene Atyalpa is using nikic/FastRoute package to route incoming requests to their respective controller/closure. Atyalpa has its own wrapper around nikic/FastRoute to help write much redable routes. All the routes are defined under web/route.php file. The route.php gets an instance of Atyalpa\Routing\Router class. You can call get(), post(), put(), patch(), delete(), and options() methods on the router instance.
On top of basic HTTP routing, the router instance also has middleware() method where you can specify middlewares to modify/validate the request or response.
If the incoming request is satisfied by defined middleware(s) (if any), then the request is served by defined controller or closure. It's where you can perform logic required to serve the reqest and send back the response.
To help you manage dependencies, Atyalpa is using php-di/php-di package for dependency injection.
You can provide the DI binding in app/Container.php file. The Container.php already contains binding for Monolog/Logger class. If we want to use an instance of a Logger class, we can simple call:
$container->get('log');The above mentioned way of defining dependencies is helpful when it comes to working with dependency inversion. you can easily bind interface to a solid class in Container.php.
Atyalpa has also enabled PHP 8 attribute injection. Let's say you want to use ExampleService class within your controller. Then you can use attribute injection:
// Services/ExampleService.php
class ExampleService
{
    public function setAnExample()
    {
        // ...
    }
}

// app/Http/HomeController.php
class HomeController
{
    #Inject
    private ExampleService $exampleService;

    public function index()
    {
        $this->exampleService->setAnExample();
    }
}As mentioned above, Atyalpa is using nikic/FastRoute but has own wrapper around it to make the routing more readable. All the routes are defined under web/routes.php file.
Adding any HTTP method route is fairly simple and follows the same format. To add a GET route:
// web/route.php

use Atyalpa\Routing\Router;
use App\Http\HomeController;

/** @var Router $router */
$router->get('/some-path', [HomeController::class, 'index']);
The first argument to the get() method is the URL path you want to serve. The second argument is an array with first element is your controller class and second element is the method you want to invoke from that controller class.
You can also pass route parameters via route path:
// web/route.php

use Atyalpa\Routing\Router;
use App\Http\HomeController;

/** @var Router $router */
$router->get('/users/{userId}', [HomeController::class, 'index']);

// App\Http\HomeController
class HomeController
{
    public function index(int $userId)
    {
        // ...
    }
}
Atyalpa will then pass the route parameters to the respective controller method when you typehint the arguments.
You can also add validation to the route with colon sepeation (:):
// web/route.php

use Atyalpa\Routing\Router;
use App\Http\HomeController;

/** @var Router $router */
$router->get('/users/{userId:\d+}', [HomeController::class, 'index']);
This will consider the route only if userId contains digits. Providing non-numeric value to userId will lead to 404 route not found.
Since Atyalpa routing is built on top of nikic/FastRoute, you can apply all formats from the package's documentation: https://github.com/nikic/FastRoute?tab=readme-ov-file#defining-routes
all other HTTP methods will follow the same format.
The post() method accepts two arguments:
- Route path
- An array with first element as the controller class and second the method of that controller class you want to use
// web/route.php

use Atyalpa\Routing\Router;
use App\Http\UserController;

/** @var Router $router */
$router->post('/users', [UserController::class, 'store']);The put() method accepts two arguments:
- Route path
- An array with first element as the controller class and second the method of that controller class you want to use
// web/route.php

use Atyalpa\Routing\Router;
use App\Http\UserController;

/** @var Router $router */
$router->post('/users/{id:\d+}', [UserController::class, 'update']);The patch() method accepts two arguments:
- Route path
- An array with first element as the controller class and second the method of that controller class you want to use
// web/route.php

use Atyalpa\Routing\Router;
use App\Http\UserController;

/** @var Router $router */
$router->patch('/users/{id:\d+}', [UserController::class, 'update']);The delete() method accepts two arguments:
- Route path
- An array with first element as the controller class and second the method of that controller class you want to use
// web/route.php

use Atyalpa\Routing\Router;
use App\Http\UserController;

/** @var Router $router */
$router->delete('/users/{id:\d+}', [UserController::class, 'destroy']);There can be scenario where you want to group the route by prefix. For example, while performing CRUD operation on a user, you may want to prefix the route path with /users. You can achive this using the route groups:
// web/route.php
use Atyalpa\Routing\Router;

/** @var Router $router */
$router->prefix('/users')->group(function (Router $router): void {
    // Equivalent to "users/" route path
    $router->get('/', [UserController::class, 'index']);

    // Equivalent to "users/" route path
    $router->post('/', [UserController::class, 'store']);

    // Equivalent to "users/{id:\d+}" route path
    $router->put('/{id:\d+}', [UserController::class, 'update']);

    // Equivalent to "users/{id:\d+}" route path
    $router->delete('/{id:\d+}', [UserController::class, 'delete']);
});Some time you may want to perform certain action before the request hits the controller. You may want to update the request itself or return early response if the request is not satisfied by your business logic. Now of course, you do so within the controller before your actual business logic execution starts. But a good practice will be to separate that concern to middlewares.
You can attach one or more middleware classes to the route using middleware() method. The method accepts one argument, an array. The array should contain middleware classes:
// web/route.php
use Atyalpa\Routing\Router;
use App\Http\Middlewares\SomeMiddleware;
use App\Http\HomeController;

/** @var Router $router */
$router->middleware([SomeMiddleware::class])
->get('/', [HomeController::class, 'index']);As Atyalpa is using ReactPHP's HTTP Server, all incoming requests are of PSR-7 HTTP Request type. Atyalpa comes with a Request and Response wrapper around ReactPHP's Request and Response class for consistency.
The object of Atyalpa/Http/RequestHandler is automatically injected to the controller class when you use PHP typhint to get the object.
// app/Http/HomeController.php

use Atyalpa\Http\RequestHandler;

class HomeController
{
    public function index(RequestHandler $requestHandler)
    {
        // $requestHandler->getQueryParams();
    }
}Since the RequestHandler class complies with PSR-7 HTTP Request, it comes with all the supported methods:
The getMethod() method returns a string with the HTTP method used for the route. The typical values will be one of:
- GET
- POST
- PUT
- PATCH
- DELETE
- OPTION
$method = $requestHandler->getMethod();The getServerParams() method returns an array and typically used to get server side parameters similar to $_SERVER variable.
$serverParams = $requestHandler->getServerParams();The getQueryParams() method returns an array with query parameters from the URL in [key => value] format. It's similar to $_GET variable.
$queryParams = $requestHandler->gerQueryParams();The getParsedBody() method returns an array format of the request body. It's similar to $_POST variable.
$data = $requestHandler->getParsedBody();The getUploadedFiles() method returns an array of uploaded files (if any). It's similar to $_FILES variable. This method will only return the data if Content-Type: multipart/form-data HTTP header is present with the request.
$files = $requestHandler->getUploadedFiles();Similar to the RequestHandler class, the Atyalpa/Http/ResponseHandler follows PSR-7 HTTP Response type.
Each controller method MUST return ResponseHandler type.
// app/Http/HomeController.php

use Atyalpa\Http\RequestHandler;
use Atyalpa\Http\ResponseHandler;

class HomeController
{
    public function index(RequestHandler $requestHandler): ResponseHandler
    {
        // Perform your business logic

        return (new ResponseHandler)
            ->json(['data' => 'some-data']);
    }
}Since the ResponseHandler class complies with PSR-7 HTTP Response, it comes with all the supported methods:
If you like to take things in your hand and construct a response on your own, you can use the ResponseHandler's constructor along with the send() method to send the response back:
// app/Http/HomeController.php

use Atyalpa\Http\RequestHandler;
use Atyalpa\Http\ResponseHandler;
use Fig\Http\Message\StatusCodeInterface;

class HomeController
{
    public function index(RequestHandler $requestHandler): ResponseHandler
    {
        // Perform your business logic

        return (new ResponseHandler(
            StatusCodeInterface::STATUS_OK,
            ['Content-Type' => 'application/json'],
            json_encode(['data' => 'some-data'])
        ))
            ->send();
    }
}
The ResponseHandler's constructor takes 3 arguments:
- The status code, type of
int - HTTP Headers, type of
array - Response body, type of
string
The send() method simply returns a response of PSR-7 HTTP Response type.
If you want to add header to the response you can use withHeader() method. The method accepts two arguments:
- Header name, type of
string - Header value, type of
mixed
(new ResponseHandler)
    ->withHeader('x-request-limit', 120)
    ->json(['data' => 'some-data']);
You can also use withHeaders() method which takes a single parameter, an array of headers:
(new ResponseHandler)
    ->withHeaders([
        'x-request-limit' => 120,
        'x-author' => 'John Doe'
    ])
    ->json(['data' => 'some-data']);
If you want to append new value to an existing header, you can use withAddedHeader() method:
(new ResponseHandler)
    ->withAddedHeader('x-author', 'Jane Doe')
->json(['data' => 'some-data']);Atyalpa is API first framework so the chance of you sending JSON response back are higher. To help with minimizing the key strokes, you can use the json() method. This will also add Content-Type: application/json header to the response. The method takes an array as argument:
(new ResponseHandler)->json(['data' => 'some-data']);Atyalpa follows PSR-7 Middleware making it easy to use and integrate middlewares in your routes. Middlewares are simple mechanism that allows you to intercept request and response to perform any additional business logic before the request hitting your controller, or before the response is sent back to the user. You can think of middlewares as layers of onions.
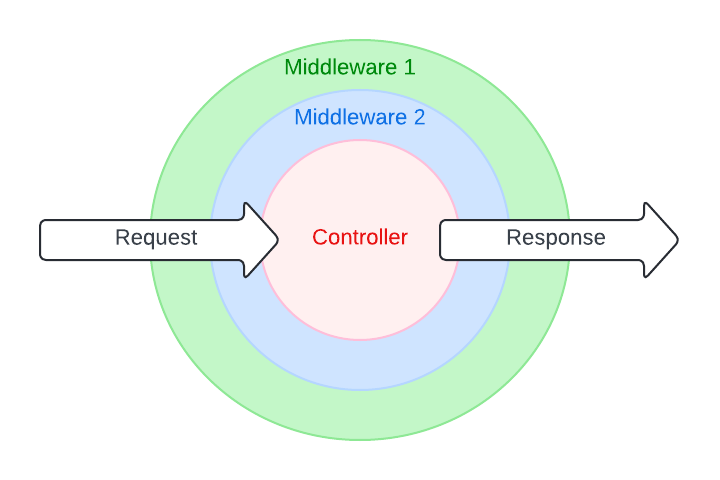
If you attach multiple middlewares to a route, then they will be executed sequentially. As shown in the example, for incoming request, Middleware 1 will be executed first, then Middleware 2 and finally moved to the Controller. If any condition from Middleware 1 is not satisfied, then it can return an early response back to the user without executing Middleware 2 and Controller.
The response follows the flipped sequence. The response from controller first handled by Middleware 2, and then Middleware 1. If any condition in Middleware 2 is matched, then it can return early response without executing the Middleware 1.
Atyalpa has included sample middlewares under App\Http\Middlewares directory. It will be a good place for you to start creating your own. Each middleware should implement Psr\Http\Server\MiddlewareInterface:
// app/Htp/Middlewares/ExampleMiddleware.php
namespace App\Http\Middlewares;

use Atyalpa\Http\ResponseHandler;
use Psr\Http\Message\ServerRequestInterface;
use Psr\Http\Message\ResponseInterface;
use Psr\Http\Server\MiddlewareInterface;
use Psr\Http\Server\RequestHandlerInterface;

class ExampleMiddleware implements MiddlewareInterface
{
    public function process(ServerRequestInterface $request, RequestHandlerInterface $handler): ResponseInterface
    {
        // You can play with $request to satisfy your business logic
        if ('some-condition') {
            return (new Response)->json(['data' => 'Something is missing.']);
        }

        return $handler->handle($request);
    }

}
Instead of handling request if you want to use the response, you can first fetch the response and then perform your business logic:
public function process(ServerRequestInterface $request, RequestHandlerInterface $handler): ResponseInterface
    {
        $response = $handler->handle($request);
        // You can play with $response to satisfy your business logic
        if ('some-condition') {
            return (new Response)->json(['data' => 'Something is missing.']);
        }

        return $response;
    }
Services are classes that gets executed whenever the application boostraps. So, if you want to perform any operation, register any classes, or configure anything, you can utilize Service classes. You can keep service classes under App/Services directory. Atyalpa ships with one service class, DatabaseService. Each service class you create should extend Atyalpa\Core\Services\Service abstract class. Any logic you want to execute during application bootstraping should be written within the handle() method.
Once you create a service class, you need to register it in app/Services.php. Atyalpa will read the array from the file to execute all registered service classes.
As the service classes are loaded and handle() method is executed during application bootstraping, to keep the application lightweight, we recommend using service classes for limited purpose.
Just like any other framework, you can write both Unit and Feature/Integration tests in Atyalpa. Writing unit tests is simple and does not need any dependency.
Atyalpa already ships with phpunit/phpunit so you can simply get started with unit tests. Unit tests can be added to the tests/Unit directory. You can take a look at tests/Unit/ExampleUnitTest.php file for the reference.
Feature or integration testing however requires some setup as you will be testing behaviour of any API as whole. To make it easy, Atyalpa has added tests/UsingHttpClient.php trait that can give you the head start. The trait is used by tests/TestCase.php class. You can start writing feature/integration tests in tests/Feature directory.
All you need to do is extend tests/TestCase.php class in your test class and you can start using all the supported HTTP methods.
// tests/Feature/MyFeatureControllerTest.php

<?php

namespace Tests\Feature;

use PHPUnit\Framework\Attributes\Test;
use Tests\TestCase;

class MyFeatureControllerTest extends TestCase
{
    #[Test]
    public function it_returns_valid_response(): void
    {
        $response = $this->get('/');

        $this->assertSame(200, $response->getStatusCode());
        $this->assertSame(
            ['data' => 'sample-data'],
            json_decode($response->getBody()->getContents(), true)
        );
    }
}