Cygnus ZMK config template for the Seeed Studio XIAO nRF52840 (used to be named as XIAO BLE) microcontroller
This repo contains the zmk shields required to use a cygnus with a Seeed Studio XIAO BLE microcontroller.
The original cygnus repo can be found here
All credit goes to the original creator juhakaup. This is just a zmk config template that adds support for the Seeed XIAO BLE.
- It's quite simple: The Seeed XIAO BLE is significantly cheaper than a nice! nano v2.
This is the pin out for the XIAO BLE
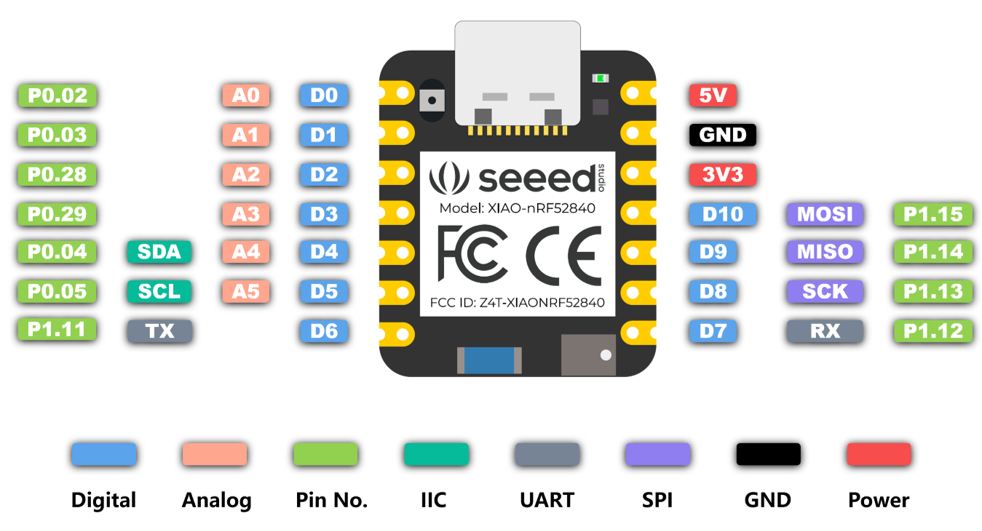
This config uses pin 0-3 for the rows and pin 4-8 for the columns.
The reset pins are on the back of the controller. (More detailed instructions can be found in the original build guide)

Like the reset pins the battery pins are also at the back of the controller.
Check polarity before connecting the battery.
Solder your battery's - wire to the BAT- pin and your battery's + to a switch, which is connected to the BAT+ pin. This way you can switch the keyboard on an off. There should be more detailed instructions in the origina build guide.
- Solder the first row ( which is the top one ) to the first pin (D0).
- Repeat this for the other rows going top to bottom from D0 to D3.
- Solder the first column ( which is the leftmost one, or the purple on in my image ) to the pin D4.
- Repeat this for the other columns going left to right from D to D8.
(sorry for the poor image quality)
This is the wiring on the back of the keyboard. For a more detailed guide please look at juhakaup's build guide.

As you can see in the picture. The black wire is connected to the first pin. As depicted in the image above, the black wire is connected to the first row of the keyboard. Following the principle all the following rows are connected to the controller in that order.
The same goes for the columns. As seen in the image above, the purple wire is connected to the leftmost column. Following the principle all the following columns are connected to the controller in that order.
Admittedly the wiring is a bit messy. But it works decently well.
Additionally as documented in the original build guide, you can use printed brackets to secure the controller in place. Due to a broken printer I have not been able to print them, but the assembly should be quite straightforward.

You should be able to repeat this process for the right side of the keyboard. The wiring is the same. Row 1 should still be connected to D0 and so on.
This is the final assembled version

If you want to use a dongle with this keyboard please take a look at this branch: dongle branch
- Fork the repo
- Clone the repo to your computer
- Change the config files in ./config
- Rebuild using github actions ( by pushing to the repo )
- Flash the firmware to the keyboard
- Connect the keyboard to your computer.
- Press the reset button on your keyboard twice. This will put the keyboard into bootloader mode.
- Drag your firmware file onto the keyboard. It should be recognized as a USB drive.
- Done
- Flip the power switch on the back of the keyboard case.
- Go to your computer's Bluetooth settings.
- Now you should be able to see a keyboard with the name "Cygnus" available.
- Follow the instructions to pair the keyboard with your computer.
- keymap, overlay and dtsi files are inspired by splitkb's corne keyboard here. Thanks to their work, I was able to port this keyboard to the Seeed XIAO BLE quite easily.
- the keyboard was designed by juhakaup. All credit goes to his amazing work. This repo just contains a zmk config template to use the keyboard with Seed XIAO BLE microcontrollers
- Thanks to the ZMK team for their amazing work on the firmware and for making it so easy to design custom shields.