English | 한글
Important
- This guide is written in detail for beginners. Skip the unnecessary parts.
- This guide is written for macOS running on Apple Silicon.
- Flutter supports macOS 10.15 (Catalina) or later.
- This guide presumes your Mac runs the zsh as your default shell.
- Install and configure Xcode
- Install Rosetta 2
- Install VSCode and the Flutter SDK
- Install Android Studio
- Install Homebrew
- Install rbenv, Ruby, and CocoaPods
- Configure Firebase
- Install Node.js and the Firebase CLI and the Futterfire
- Configure your project
- Build your Applimode app
- Build and release a web app
- Build an APK for Android
- Change the images for the app icon and the launch screen
- Add administrator
- Admin settings and custom_settings.dart
- Configure Cloudflare R2 (Optional)
- Configure Cloudflare D1 (Optional)
- Configure Cloudflare CDN (Optional)
- Configure Youtube image proxy (Optional)
- Configure Youtube video proxy (Optional)
- Use your custom domain (Optional)
- Upgrade your project with the new Applimode version
- Add phone sign-in
- Set up the AI assistant (Gemini)
- Configure push notification
- Configure Cloud Firestore Security Rules
- Configure writing access for admin users only
- Change the app's main color
- Change the app's name
- Change the organization name for the app
- Troubleshooting
- Download, install, and open Xcode.
- If iOS is not checked in the Select the platforms box, check it and click Install or Download & Installl.
- Once the download is complete, close Xcode.
- Click the Spotlight icon in the menu bar. (or press
Command+Space Bar) - In the search field, type terminal and select it.
- Run the following command.
sudo softwareupdate --install-rosetta --agree-to-license- Download, install, and launch VSCode.
- To open the Command Palette, press
Command+Shift+P. (or chosse View > Command Palette) - Type shell and select Shell Command: Install 'code' command in PATH.
- Press
Command+Shift+X. (or choose View > Extensions) - Type flutter and click Install.
- Press
Command+Shift+P. - In the Command Palette, type flutter.
- Select Flutter: New Project.
- Click Download SDK at the bottom right.
- Create a folder (choose File > New Folder, or press
Command+Shift+N) and name it development. - Click Clone Flutter.
- When finished, the Flutter SDK should be in the ~/development/flutter directory.
- Open or go to Terminal.
- To add Flutter to the PATH environment variable, run the following command.
nano ~/.zshenvNote
Use your preferred text editor.
- Copy the following line and paste it at the end of your ~/.zshenv file.
export PATH=$HOME/development/flutter/bin:$PATH- To save your ~/.zshenv file, press
control+O, then Enter, and finallycontrol+X.
- Run the following command.
source ~/.zshenv- Close VSCode.
- Download, install, and launch Android Studio.
- Click Pulgins (on the left sidebar), type flutter, click Install, and then click Restart IDE.
- Click Projects (on the left sidebar), then More Actions (in the Center), and finally SDK Manager.
- Click SDK Tools (on the top menu).
- Check Android SDK Command-line Tools, then click Apply (on the bottom right).
- Open or go to Terminal.
- Run the following command and press
yto all questions.
flutter doctor --android-licenses- Close Android Studio and Terminal.
- Open or go to Terminal.
- Run the following command
/bin/bash -c "$(curl -fsSL https://raw.githubusercontent.com/Homebrew/install/HEAD/install.sh)"For more details, visit this page.
- Run these two commands in the following part of the output.
===> Next steps:
- Run these two commands in your terminal to add Homebrew to your PATH:
    (echo; echo 'eval "$(/opt/homebrew/bin/brew shellenv)"') >> /Users/<USERNAME>/.zprofile
eval "$(/opt/homebrew/bin/brew shellenv)"- Close Terminal.
- Open or go to Terminal.
- Run the following command.
brew install rbenv- To add rbenv to the PATH environment variable, run the following command.
nano ~/.zshrc- Copy the following line and paste it at the end of your ~/.zshrc file.
export PATH="$HOME/.rbenv/bin:$PATH"
eval "$(rbenv init - zsh)"- To save your ~/.zshrc file, press
control+O, then Enter, and finallycontrol+X. - Close Terminal and reopen it.
- Run the following commands.
rbenv install 3.2.3rbenv global 3.2.3source ~/.zshrcsudo gem install cocoapodssudo sh -c 'xcode-select -s /Applications/Xcode.app/Contents/Developer && xcodebuild -runFirstLaunch'sudo xcodebuild -license- type agree.
nano ~/.zshrc- Copy the following line and paste it at the end of your ~/.zshrc file.
export PATH=$HOME/.gem/bin:$PATH- To save your ~/.zshrc file, press
control+O, then Enter, and finallycontrol+X. - Close Terminal.
- Sign up or log in to Firebase.
- Click Go to console.
- Click Create a project.
- Enter a project name and click Continue.
- Enable Gemini in Firebase then click Continue.
- Enable Google Analytics for this project then click Continue.
- Select your Google Analytics account or select Default Account for Firebase. Click Create Project.
- When you see the message Your Firebase project is ready, click Continue at the bottom.
- Click Upgrade on the bottom of the left sidebar.
- Click Select plan to choose Blaze plan.
- In Choose a Cloud Billing account, select your billing account, enter your Budget amount, and click Continue.
- Click Link Cloud Billing account, and click Done.
Note
To use complete services like - Cloud Storage, Cloud Functions to trigger push notifications etc, Vertex AI in Firebase & to remove all limits, you must Upgrade the default Spark plan (Free Plan) to Blaze plan (Monthly Billed Paid Plan). However, Google will only Bill you monthly after your free quota gets exhausted depending upon the usage. You can also set Billing Alerts when it crosses your mentioned amount every month. You may refer Firebase official pricing page to compare both plans.
- Click Build (on the left sidebar) and click Authentication.
- Click Get started and then click Email/Password.
- Enable Email/Password and click Save.
- Click Build (on the left sidebar) and then click Firestore Database.
- Click Create database and select a location for your database.
- Click Next and then click Create.
- Click Build (on the left sidebar) and then click Storage.
- Click Get started, select a location for your storage, then click Continue, and finally click Create.
- Open or go to Terminal.
- Run the following commands.
brew install nvmnano ~/.zshrc- Copy the following line and paste it at the end of your ~/.zshrc file.
export NVM_DIR="$HOME/.nvm"
[ -s "/opt/homebrew/opt/nvm/nvm.sh" ] && \. "/opt/homebrew/opt/nvm/nvm.sh"  # This loads nvm
[ -s "/opt/homebrew/opt/nvm/etc/bash_completion.d/nvm" ] && \. "/opt/homebrew/opt/nvm/etc/bash_completion.d/nvm" # This loads nvm bash_completion- To save your ~/.zshrc file, press
control+O, then Enter, and finallycontrol+X. - Run the following commands.
source ~/.zshrcnvm install --ltsnpm install -g firebase-tools- Close Terminal and reopen it.
- Run the following commands.
firebase logindart pub global activate flutterfire_clinano ~/.zshrc- Copy the following line and paste it at the end of your ~/.zshrc file.
export PATH="$PATH":"$HOME/.pub-cache/bin"- To save your ~/.zshrc file, press
control+O, then Enter, and finallycontrol+X. - Run the following command.
source ~/.zshrc- Open or go to Terminal.
- Run the following commands.
mkdir ~/projects; cd ~/projects;git clone https://github.com/mycalls/applimode.gitcp -r ./applimode/applimode-tool ./; node ./applimode-tool/index.js init; rm -r ./applimode-tool- Enter your project name, long app name, short app name, and organization name.
Note
- The project name is used to create the project folder name and the bundle ID for the apps (web, Android, iOS).
- The long app name is mainly used for web apps.
- The short app name is mainly used for mobile apps (iOS, Android).
- The organization name, along with the project name, is used to create each bundle ID for use in the App Store and Play Store. The bundle ID must be unique, so please decide carefully.
- Close Terminal.
- Open VSCode
- Click File (on the top menu of VSCode), select Open Folder, choose your project folder (maybe in the projects folder), and click Open.
- Click View (on the top menu of VSCode), then select Terminal.
- Run the following commands in order:
flutter pub getdart run build_runner build -dflutterfire configure --platforms=android,ios,web
- when asked something, press n or N.
- If you encounter an error as a result of this command, run the following command and then retry.
dart pub global activate flutterfire_cli
node ./applimode-tool/index.js firebasercfirebase deploy --only firestorefirebase deploy --only storage- Open Google Cloud console in your web browser.
- Sign up or log in.
- Select your project on the top left.
- Click Activate Cloud Shell on the top right.

- Run the following command in the shell at the bottom.

echo '[{"origin": ["*"],"method": ["GET"],"maxAgeSeconds": 3600}]' > cors.json- Open or go to your Firebase console in your web browser.
- Click your project.
- Click Storage (on the left sidebar).
- Click the Copy folder path icon (to the left of the URL starting with gs://) to copy your cloud storage bucket.

- Go back to your Google Cloud console.
- Run the following commands in the shell at the bottom.

gsutil cors set cors.json gs://<your-cloud-storage-bucket>exitImportant
Do this chapter after your Firestore indexing is complete. (about 5 minutes) You can check your Firestore indexing here. Firebase console > your project > Firestore Database > Indexes
- Go to or open your Applimode project in VSCode.

- Click the Select Device section at the bottom right. (or press
Command+Shift+P, then type flutter and select Flutter: Select Device.)

- Select a target device from the Select Device prompt.
- Press
Command+Shift+D. (or click the Run and Debug button on the left menu) - Click the Select Debug Mode button at the top left and select Run (release mode).
- Click the Start Debugging button at the top left. (or press
F5orFn+F5)
Note
- Select Chrome or Edge for web apps.
- To enable Developer options and USB debugging on your android device, refer to this page.
- If you connect an Android device but it does not appear in the device list, try changing the USB Preferences to Charging or File transfers.
- If you haven't enrolled in the Apple Developer program, enroll now.
To learn more about membership types, check out Choosing a Membership.
- Tap on Settings > Privacy & Security > Developer Mode on your iOS device.
- Tap to toggle Developer Mode to On.
- Tap Restart.
- When the Turn on Developer Mode? dialog appears, tap Turn On.
- Go to or open your Applimode project in VSCode.
- Attach your iOS device to the USB port on your Mac.
- Click the Select Device section at the bottom right. (or press
Command+Shift+P, then type flutter and select Flutter: Select Device.)
- Select your iOS device from the Select Device prompt.
- Press
Command+Shift+D. (or click the Run and Debug button on the left menu) - Click the Select Debug Mode button at the top left and select Run (release mode).
- Click the built-in terminal at the bottom. (or choose View > Terminal)
- Run the following command.
open ios/Runner.xcworkspace- Your Applimode project will open in Xcode.

- Select your iOS device from the Select Device panel.
- In the left navigation panel under Targets, select Runner.
- In the Runner settings pane, click Signing & Capabilities.
- Select All at the top.
- Select Automatically manage signing.
- Select a team from the Team dropdown menu.
- If there is no activity in Xcode's progress window, close Xcode.

Note
- Teams are created in the App Store Connect section of your Apple Developer Account page. If you have not created a team, you can choose a personal team.
- The Team dropdown displays that option as Your Name (Personal Team).
- Go back to VSCode.
- Click the Start Debugging button at the top left. (or press
F5orFn+F5) - The VSCode build will fail.
- Click the built-in terminal at the bottom. (or choose View > Terminal)
- Run the following commands.
flutter cleanflutter pub getcd iosrm -rf Podsrm -rf Podfile.lockpod install --repo-updatecd ..open ios/Runner.xcworkspace- Your Applimode project will open in Xcode.
- Select your iOS device from the Select Device panel.
- In the left navigation panel under Targets, select Runner.
- Click Product (on the top menu of Xcode), then click Scheme, and finally click Edit Scheme.
- Click Run in the left panel.
- Select Release from the Build Configuration dropdown menu in the Info tab.
- If there is no activity in Xcode's progress window, click Product (on the top menu of Xcode), then click Clean Build Folder.
- Click the play icon button on the top left. (or press
Command+R)
Note
- If you receive an Untrusted Developer error message on your iOS device, follow these steps.
- On your iOS device, open Settings.
- Choose General > VPN & Device Management.
- Choose the affected profile and trust it.
Note
- If you receive an iproxy error message on your mac, follow these steps.
- On your mac, open System settings.
- Choose Privacy and Security > VPN & Device Management.
- Scroll down and click Allow anyway.
Note
If your Applimode app fails to build in Xcode, follow these steps.
- After your app build completes, follow this chapter.
- After the app build completes, click the write button on the bottom right.
- Click Register on the login screen and complete your signup.
- Click the write button and write the first post. (if you are testing Cloudflare R2 or CDN, write the post with an image or a video)
- To end the test drive, click Run (on the top menu of VSCode) and select Stop Debugging. (or press
Shift+F5orShift+fn+F5)
Important
Except for changes made on the admin settings page of the app, if you modify the app's settings or configuration, rebuild and redeploy the app according to the next chapter.
- Go to or open your Applimode project in VSCode.
- Click View (on the top menu of VSCode) and select Terminal.
- Run the following command:
flutter build web --releasefirebase deploy --only hosting- Open or go to your Firebase console in your web browser.
- Click your project.
- Click Hosting (on the left sidebar).
- Scroll down to find the Domains section.
- Click the domain address.
- If you want to use your custom domain, read this chapter.
- Please visit this page for how to install a PWA(Progressive Web App) on your phone and computer.
Important
Except for changes made on the admin settings page of the app, if you modify the app's settings or configuration, rebuild and redeploy the app according to the next chapter.
- Go to or open your Applimode project in VSCode.
- Click View (on the top menu of VSCode) and select Terminal.
- Run the following command:
flutter build apk --release --target-platform=android-arm64- You can find your apk file here: <your-project-folder>\build\app\outputs\apk\release or <your-project-folder>\build\app\outputs\flutter-apk\app-release.apk
For more details, visit this link.
- If you have prepared images for the app icon and launch screen of your project, follow the steps below. If you don't have them yet, you can skip this step and set them later.
Note
- Create the icons using the Figma template provided in the following link or by referring to the sizes listed below with your preferred tool.
- app-bar-logo.png - 128 * 128 (Margin of about 4 px, no background)
- app-icon-512.png - 512 * 512 (Use an image of 1024 px)
- app-icon-1024.png - 1024 * 1024 (Margin of about 160 px)
- app-logo-android12.png - 960 * 960 (Margin of about 240, no background)
- app-logo.png - 720 * 720 (Margin of about 8 px, no background)
- Press
Cmd+SpaceBar, type your applimode project name. (or Open Finder) - Open your project folder (maybe in the projects folder), open the assets folder, and then open the images folder.
- Replace the image files in the folder with the image files you prepared.
- Go to or open your Applimode project in VSCode.
- Run the following commands in order:
dart run flutter_native_splash:createflutter pub run flutter_launcher_iconsnode ./applimode-tool/index.js splash- Open or go to your Firebase console in your web browser.
- Click your project.
- Click Authentication (on the left sidebar).
- Click the Copy UID button next to your User UID. (Move your mouse cursor over your User UID to display the button)

- Click Firestore Database (on the left sidebar).
- Click the users collection and select your uid.
- Click the Edit field button (pencil shape) next to the isAdmin field. (Move your mouse cursor over the isAdmin field to display the Edid field button)

- Change the value from false to true and click Update.


- Go to or open your Applimode project in VSCode.
- Click View (on the top menu of VSCode) and select Terminal.
- Run the following command:
node ./applimode-tool/index.js admin- Paste your uid that you copied.
- Run the following command:
firebase deploy --only firestoreNote
- You can modify the service to allow only verified users to access it through the following steps.
- First, follow the next chapter to update the Firestore security rules.
- Open or go to your Firebase console in your web browser.
- Click your project. Click Firestore Database (on the left sidebar).
- Click the users collection and select your uid.
- Click the Edit field button (pencil shape) next to the verified field. (Move your mouse cursor over the verified field to display the Edid field button)
- Change the value from false to true and click Update.
- Copy the uid value from the uid field.
- Go to or open your Applimode project in VSCode.
- Click View (on the top menu of VSCode) and select Terminal.
- Run the following command:
node ./applimode-tool/index.js verified- Paste the uid that you copied.
- Run the following command:
firebase deploy --only firestoreCaution
If you designate someone as an administrator, the user can change admin settings in the app, edit, delete or block all posts, and even block all posts from a specific user.
Note
- The Admin settings page and the custom_settings.dart file are where you can directly change the app's settings.
- The Admin settings page is a GUI representation of the entries in the custom_settings.dart file.
- All entries in the custom_settings.dart file will be moved to the app's Admin settings page.
- If you change the custom_settings.dart file, you must rebuild it to apply it to your app.
- Add administrator is required first to activate the Admin Settings tab in your app.
- Open your Applimode app. (If you selected Chrome or Edge as your target device in the Build your Applimode app chapter, press
F5orFn+F5to rebuild.) - Click the menu button on the top left of the home screen.
- Click Admin settings. (If you can't find the Admin settings tab, restart your app.)
- After changing the settings, click Save at the bottom.
- To change the custom_settings.dart, go to or open your Applimode project in VSCode.
- Press
Command+Pand type custom_settings.dart, then click. - Change appCreator and appVersion to your desired values.
Important
fullAppName, shortAppName, underbarAppName, camelAppName, androidBundleId, appleBundleId, and firebaseProjectName are values used when upgrading your project. Do not change them. If you want to make changes, refer to this chapter and configure your project again.
- The values with spare in front of the name are used when users first run your app after installing it. (when Admin settings are not yet activated). You can change them to whatever values you want.
Note
- If you change a value in Admin settings, it is recommended to also change the corresponding spare value in the custom_settings.dart file.
- For example, if you change the App style value, also change the sparePostsListType value in the custom_settings.dart file.
- The App style values in Admin Settings correspond to the sparePostsListType values in the custom_settings.dart file as follows.
- List style - PostsListType.small
- Card style - PostsListType.square
- Page style - PostsListType.page
- Round card style - PostsListType.round
- Mixed style - PostsListType.mixed
- When you have made all changes, press
Command+S. - We will prepare more detailed information on all values of Admin settings and custom_settings.dart soon.
Note
- The biggest advantage of R2 is that transfer fees are free. (Firebase Cloud Storage is free for transfers up to 1 GB per day, after which a fee of $0.12 is charged for each GB)
- You can also use Cloudflare's CDN for free by registering a domain and connecting it with R2.
- If you are building a video-centric app, I highly recommend using Cloudflare R2.
- R2 pricing plans
- Workers pricing plans
- Go to the Cloudflare console.
- Sign up or log in.
- Click R2 Object Storage (on the left sidebar).
- Fill out the R2 subscription form and complete the R2 subscription.
- Open Terminal.
- Run the following commands.
cd ~/projectsnpm create cloudflare@latest -- <your_r2_worker_name>ex) npm create cloudflare@latest -- applimode-r2-worker
- Select default values for all questions.
- Close Terminal.
- Go to or open VSCode.
- Click File (on the top menu of VSCode) and select Open Folder.
- Select the <your_r2_worker_name> folder and click Open.
- Click View (on the top menu of VSCode) and select Terminal.
- Run the following command:
npx wrangler r2 bucket create <your_r2_bucket_name>ex) npx wrangler r2 bucket create applimode-bucket
- Press
Command+Pand type wrangler.json, then click. - Add the following to the middle of your wrangler.json file.
{
  "$schema": "node_modules/wrangler/config-schema.json",
  "name": "<your_r2_worker_name>",
  "main": "src/index.ts",
  "compatibility_date": "2025-01-24",
  // Copy from this part
  "r2_buckets": [
    {
      "binding": "MY_BUCKET",
      "bucket_name": "<YOUR_BUCKET_NAME>"
    }
  ],
  // to this part and paste it in the designated location.
  // Replace <YOUR_BUCKET_NAME> with the name of the bucket you just created.
  "observability": {
    "enabled": true
  }
}- To save, press
Command+S. (or File > Save) - Open this page and click the Copy raw file button (next to the Raw button) on the upper-right corner of the file view.

- Go back to VSCode.
- Press
Command+Pand type index.ts, then click. - Press
Command+Aand pressCommand+V. - To save, press
Command+S. (or File > Save) - Click Terminal at the bottom of VSCode and run the following commands.

npx wrangler secret put AUTH_KEY_SECRET
when asked something, press y or Y.
- Type a secret for your worker.
- After completing the above process, run the following command.
npx wrangler deploy
- Click File (on the top menu of VSCode) and select Open Folder.
- Select your project folder (maybe in the projects folder) and click Open.
- Click View (on the top menu of VSCode), then select Terminal.
- Run the following commands in order.
node ./applimode-tool/index.js worker- Type your secret for your worker that you entered.
dart run build_runner cleandart run build_runner build --delete-conflicting-outputs- Press
Command+Pand type custom_settings.dart, then click. - Press
Command+Fand type useRTwoStorage. - Change the useRTwoStorage value from false to true.
ex) const bool useRTwoStorage = true;
- Go to the Cloudflare dashboard.
- From the left sidebar, select Compute (Workers), then click on the worker name in bold from the list.
- From the top tabs, click Settings, and in the Domains and Routes section, copy the value of workers.dev.
- Go back to VSCode.
- Press
Command+Fand type rTwoBaseUrl. - Change the rTwoBaseUrl value from yourR2WorkerUrl to the route you copied.
ex) const String rTwoBaseUrl = 'applimode-r2-worker.yourID.workers.dev';
- Press
Command+S. (or File > Save) - To make sure it works well, follow the Build your Applimode app chapter.
Note
- Applimode supports hashtag search by default. Search is possible only if the user adds # in front of the word when writing a post.
- If you only want to use hashtag search, skip this chapter, or if you want to use full-text search, follow this chapter.
- D1 pricing plans
- Open Terminal.
- Run the following commands.
cd ~/projectsnpm create cloudflare@latest -- <your_d1_worker_name>ex) npm create cloudflare@latest -- applimode-d1-worker
- Select default values for all questions.
- Close Terminal.
- Go to or open VSCode.
- Click File (on the top menu of VSCode) and select Open Folder.
- Select the <your_d1_worker_name> folder and click Open.
- Click View (on the top menu of VSCode) and select Terminal.
- Run the following command:
npx wrangler d1 create <db-name>ex) npx wrangler d1 create applimode-d1
- If it runs successfully, you'll see the following information in Terminal.
[[d1_databases]]
binding = "DB"
database_name = "<db-name>"
database_id = "<unique-ID-for-your-database>"
- Press
Command+Pand type wrangler.json, then click. - Add the following to the middle of your wrangler.json file.
{
  "$schema": "node_modules/wrangler/config-schema.json",
  "name": "<your_d1_worker_name>",
  "main": "src/index.ts",
  "compatibility_date": "2025-01-24",
  // Copy from this part
  "d1_databases": [
    {
      "binding": "DB",
      "database_name": "<db-name>",
      "database_id": "<unique-ID-for-your-database>"
    }
  ],
  // to this part and paste it in the designated location.
  // Replace <db-name> and <unique-ID-for-your-database> with the information previously output.
  "observability": {
    "enabled": true
  }
}- To save, press
Command+S. (or File > Save) - Open this page and click the Copy raw file button (next to the Raw button) on the upper-right corner of the file view.
- Go back to VSCode.
- Click File and click New File.... (or click the New File button)

- Type posts.sql and press
Enterand click Create File. (in your project root folder) - To paste and save, press
Command+VandCommand+S. - Open this page and click the Copy raw file button (next to the Raw button) on the upper-right corner of the file view.
- Go back to VSCode.
- Press
Command+Pand type index.ts, then click. - Press
Command+Aand pressCommand+V. - To save, press
Command+S. - Click Terminal on the bottom of VSCode and run the following commands. (To find your , go to the wrangler.json file, refer to database_name)

npx wrangler d1 execute <your-d1-db-name> --remote --file=./posts.sql
npx wrangler deploy
- Click File (on the top menu of VSCode) and select Open Folder.
- Select your project folder (maybe in the projects folder) and click Open.
- Press
Command+Pand type custom_settings.dart, then click. - Press
Command+Fand type useDOneForSearch. - Change the useDOneForSearch value from false to true.
ex) const bool useDOneForSearch = true;
- Go to the Cloudflare dashboard.
- From the left sidebar, select Compute (Workers), then click on the worker name in bold from the list.
- From the top tabs, click Settings, and in the Domains and Routes section, copy the value of workers.dev.
- Copy your route.
- Go back to VSCode.
- Press
Command+Fand type dOneBaseUrl. - Change the dOneBaseUrl value from yourD1WorkerUrl to the route you copied.
ex) const String rTwoBaseUrl = 'applimode-d1-worker.yourID.workers.dev';
- Press
Command+S. (or File > Save) - To make sure it works well, follow the Build your Applimode app chapter.
Important
- To use Cloudflare's CDN, your domain must be registered with Cloudflare.
- If you don't have a domain, go to the Cloudflare console and click Domain Registration (on the left sidebar) and click Register Domain.
- If you need to transfer your domain to cloudflare, go to the Cloudflare console and click Domain Registration (on the left sidebar) and click Transfer Domain.
- Domain registration documentation
- Domain transfer documentation
- Go to the Cloudflare console.
- Click R2 Object Storage (on the left sidebar) and in Overview, select the bucket you want.
- Click Settings on the top, scroll down to find the Public access section.
- In Custom Domains, click Connect Dommain.
- Type the domain for CDN and click Continue.
If you have a domain called applimode.com, type a sub domain like media.applimode.com or cdn.applimode.com or content.applimode.com.
- Click Account Home (on the left sidebar) and click your domain.
- Click Rules (on the left sidebar) and click Manage Response Header Transform Rules on the bottom left.
- Click + Create rule.
- Type the rule name like applimode-r2-cors.
- Select Custom filter expression.
- In Field, select Hostname and in Operator, select equals and in Value, type the sub domain you connected to your R2 bucket. (like media.applimode.com or cdn.applimode.com or content.applimode.com)
- In Select item, select Add.
- In Header name, copy and paste the following expression.
access-control-allow-origin
- In Value, type *.
- Click Deploy.

- Go to or open VSCode.
- Click File (on the top menu of VSCode) and select Open Folder and select your project folder (maybe in the projects folder) and click Open.
- Press
Command+Pand type custom_settings.dart, then click. - Press
Command+Fand type useCfCdn. - Change the useCfCdn value from false to true.

ex) const bool useCfCdn = true;
- Press
Command+Fand type cfDomainUrl. - Change the cfDomainUrl value from yourCustomDomainUrl to the sub domain you connected to your R2 bucket. (like media.applimode.com or cdn.applimode.com or content.applimode.com)
ex) const String cfDomainUrl = 'media.applimod.com';
- Press
Command+S. (or File > Save) - To make sure it works well, follow the Build your Applimode app chapter.
Note
- In posts containing YouTube links, there are cases where the preview image cannot be retrieved due to CORS issues.
- You can solve this problem by configuring a proxy worker for YouTube images.
- Open Terminal.
- Run the following commands.
cd ~/projectsnpm create cloudflare@latest -- yt-thumbnail-worker- Select default values for all questions.
- Close Terminal.
- Open this page and click the Copy raw file button (next to the Raw button) on the upper-right corner of the file view.
- Go to or open VSCode.
- Click File (on the top menu of VSCode) and select Open Folder.
- Select the yt-thumbnail-worker folder and click Open.
- Press
Command+Pand type index.ts and click. - Press
Command+Aand pressCommand+V. - To save, press
Command+S. - Click View (on the top menu of VSCode) and select Terminal.
- Run the following command.
npx wrangler deploy
- Go to the Cloudflare dashboard.
- From the left sidebar, select Compute (Workers), then click yt-thumbnail-worker from the list.
- From the top tabs, click Settings, and in the Domains and Routes section, copy the value of workers.dev.
- Go back to VSCode.
- Click File (on the top menu of VSCode) and select Open Folder and select your project folder (maybe in the projects folder) and click Open.
- Press
Command+Pand type custom_settings.dart and click. - Press
Command+Fand type youtubeImageProxyUrl. - Change the youtubeImageProxyUrl value from yt-thumbnail-worker.jongsukoh80.workers.dev to the route you copied.
ex) const String rTwoBaseUrl = 'yt-thumbnail-worker.yourID.workers.dev';
- Press
Command+S. (or File > Save)
Note
- When opening a YouTube video in a post, the page where the video is embedded is sent.
- If not configured, youtube-nocookie.com will be used.
- Open Terminal.
- Run the following commands.
cd ~/projectsnpm create cloudflare@latest yt-iframe-wroker- Select default values for all questions.
- Close Terminal.
- Open this page and click the Copy raw file button (next to the Raw button) on the upper-right corner of the file view.
- Go to or open VSCode.
- Click File (on the top menu of VSCode) and select Open Folder.
- Select the yt_iframe_worker folder and click Open.
- Press
Command+Pand type index.ts and click. - Press
Command+Aand pressCommand+V. - To save, press
Command+S. - Click View (on the top menu of VSCode) and select Terminal.
- Run the following command.
npx wrangler deploy
- Go to the Cloudflare dashboard.
- From the left sidebar, select Compute (Workers), then click yt_iframe_worker from the list.
- From the top tabs, click Settings, and in the Domains and Routes section, copy the value of workers.dev.
- Go back to VSCode.
- Click File (on the top menu of VSCode) and select Open Folder and select your project folder (maybe in the projects folder) and click Open.
- Press
Command+Pand type custom_settings.dart and click. - Press
Command+Fand type youtubeIframeProxyUrl. - Paste the route you copied in the youtubeIframeProxyUrl value.
ex) const String youtubeIframeProxyUrl = 'yt-iframe-worker.yourID.workers.dev';
- Press
Command+S. (or File > Save)
- Open or go to your Firebase console in your web browser.
- Click your project.
- Click Hosting (on the left sidebar).
- Scroll down to find the Domains section.
- Click Add custom domain.
- Open Terminal.
- Run the following commands.
flutter upgradecd ~/projects;git clone https://github.com/mycalls/applimode.gitcp -r ./applimode/applimode-tool ./; node ./applimode-tool/index.js upgrade; rm -r ./applimode-tool- Enter your existing project directory name.
- Close Terminal.
- Open VSCode
- Click File (on the top menu of VSCode), select Open Folder, choose your new project folder (maybe in the projects folder), and click Open.
- Click View (on the top menu of VSCode), then select Terminal.
- Run the following commands in order:
flutter pub getdart run flutter_native_splash:createflutter pub run flutter_launcher_iconsnode ./applimode-tool/index.js splashdart run build_runner build -dflutterfire configure --platforms=android,ios,webwhen asked something, press n or N.
node ./applimode-tool/index.js firebasercfirebase deploy --only firestorefirebase deploy --only storage- Delete your old project folder.
- Open or go to your Firebase console in your web browser.
- Click your project.
- Click Authentication (on the left sidebar).
- Select the Sign-in method tab.
- Click Add new provider and then click Phone.
- Find the Phone switch and enable it.
- Click the Save button.
- Go to or open your Applimode project in VSCode.
- Click View (on the top menu of VSCode), then select Terminal.
- Run the following command.
node ./applimode-tool/index.js auth- Type
2(phone only) or3(email and phone) and pressEnter.
- If you are only deploying a web app (PWA), no special actions are required.
Note
While releasing the app, make sure to get the key from Play Console. Here is the helpful link.
- Run the following command.
keytool -list -v \
-alias androiddebugkey -keystore ~/.android/debug.keystore
Note
If Java is not installed on your machine, an error will occur. Please install Java first.
- After being prompted for the key password, type android and press
Enter. - Copy the SHA1 key.
- Open the Firebase console > your project > Project Overview > Project Settings and scroll down to Your apps section.
- Select your Android App from the left side menu.
- Find the SHA certificate fingerprints section and click Add fingerprint.
- Enter the copied SHA-1 into the input box and click on Save.
- Open the Google Developers Console (Make sure your project is selected in the dropdown at the top).
- Enter Google Play Integrity API in the search bar at the top, go to the product details page, and enable it.
- Open the Firebase console > your project > Project Overview > Project Settings and scroll down to Your apps section.
- Select your Apple App from the left side menu.
- Find the Encoded App ID section and copy the value (app-1-xxxxxxxxxxxx-ios-xxxxxxxxxxxxxxxxxxxxxx).
- Go to or open your Applimode project in VSCode.
- Click View (on the top menu of VSCode), then select Terminal.
- Run the following command.
open ios/Runner.xcworkspace- Click Runner in the left tree view.
- Click Runner from the TARGETS section, then select the Info tab, and expand the URL Types section.
- Click the
+button, and add your Encoded App ID as a URL Schemes. - Leave the other fields blank.
- When completed, your config should look something similar to the following (but with your application-specific values)
- To complete the task, follow the steps in the Configure Push Notification section.

- To use the AI assistant when writing posts in your Applimode app, follow these steps.
- Go to or open your Applimode project in VSCode.
- Click View (on the top menu of VSCode), then select Terminal.
- Run the following command.
node ./applimode-tool/index.js ai- Type
yand pressEnter. - Choose between Flash and Pro (Flash is faster and more cost-effective, while Pro is more powerful but also more expensive).
- Open or go to your Firebase console in your web browser.
- Click your project.
- Refresh the current page.
- Click Build with Gemini (on the left sidebar).
- Click Get started on the Vertex AI in Firebase card.
- Click Enable APIs, then click Continue.
Note
- To use APNs (Apple Push Notification service), you must register for Apple Developer Program. (99 USD)
- Go to or open VSCode.
- Click File (on the top menu of VSCode) and select Open Folder and select your project folder (maybe in the projects folder) and click Open.
- Click View (on the top menu of VSCode) and select Terminal.
- Run the following commands.
node ./applimode-tool/index.js fcmNote
- To find the vapid key, open or go to your Firebase console.
- Click your project.
- Click the settings button on the top of the left sidebar.
- Click Project settings.

- Click Cloud Messaging on the top tab menu and scroll to the bottom.
- Click Generate key pair.
- Copy Key pair of Web Push certificates.


cd functions
npm install
firebase deploy --only functions
cd ..
- Open your Apple Developer page in your web browser.
- Click Keys in the Certificates, IDs & Profiles section.
- Click the blue plus button.
- Enter a name of the key in the Key Name box. (anything is OK)
- Enalbe Apple Push Notifications service (APNs).
- Click Continue & then Save.
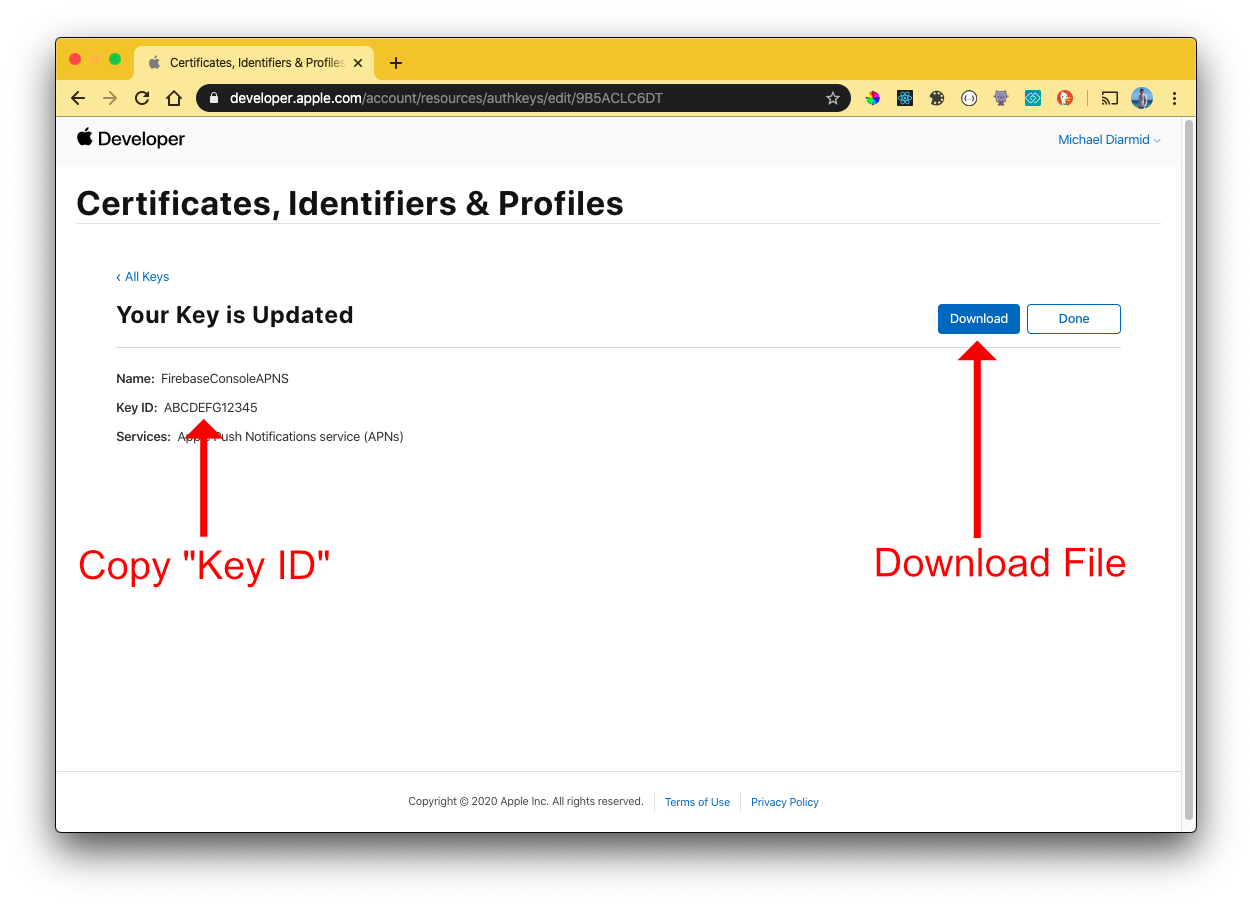
- Once saved, you will be presented with a screen displaying the private Key ID & the ability to download the key. Copy the ID, and click Download to download the file to your local machine.
- Open your Firebase console in your web browser.
- Click your project.
- Select your iOS application under the Apple app configuration heading.
- Click Upload under the APNs Authentication Key heading.
- Upload the downloaded file and enter the Key & Team IDs.
Note
To find your Team ID, open this page in your web browser. Then, press Command + F and type team id.
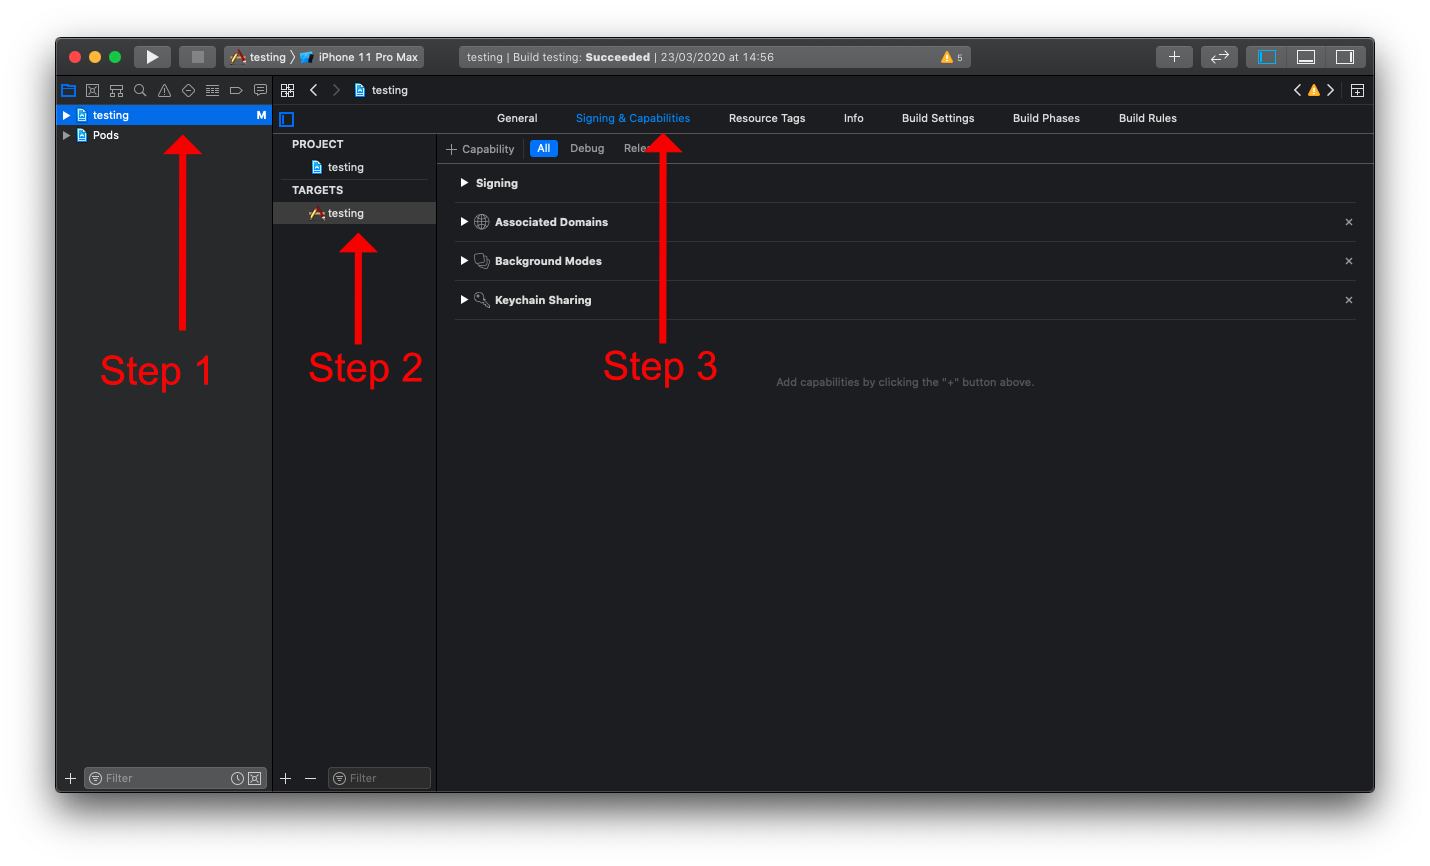
- Go back to your project open in Xcode. (if you closed Xcode, refer to this section)
- Select your project.
- Select the project target.
- Select the Signing & Capabilities tab.
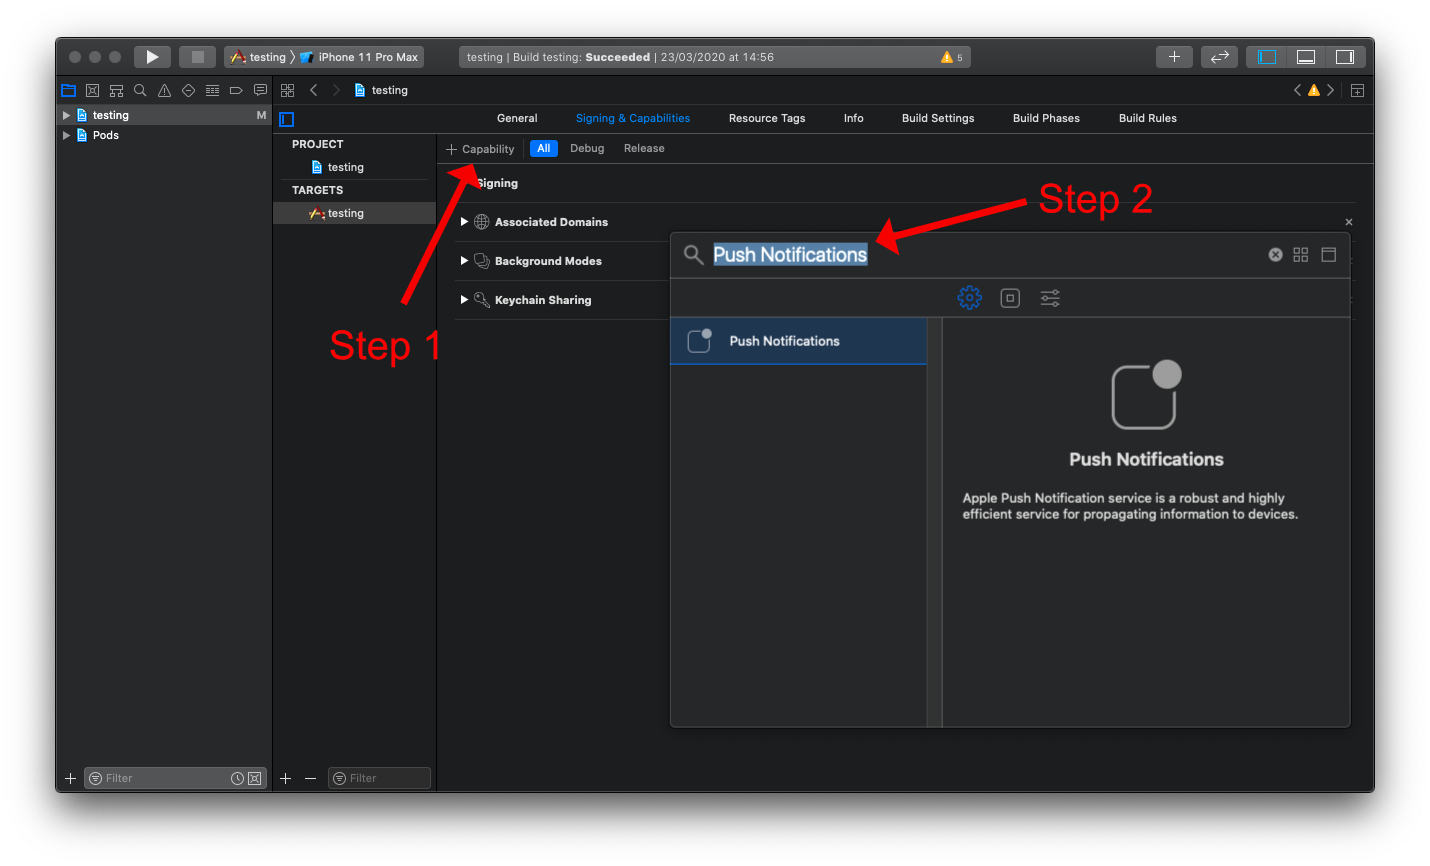
- Click on the + Capabilities button.
- Search for Push Notifications.
- Once selected, the capability will be shown below the other enabled capabilities. If no option appears when searching, the capability may already be enabled.
- Click on the + Capabilities button.
- Search for Background Modes.
- Once selected, the capability will be shown below the other enabled capabilities. If no option appears when searching, the capability may already be enabled.
- Ensure that both the Background fetch and the Remote notifications sub-modes are enabled:
- Copy your Bundle Identifier.
- Go back to your Apple Developer page in your web browser.
- Click the Identifiers side menu item.
- Click the plus button to register a App Identifier.
- Select the App IDs option and click Continue.
- Select the App type option and click Continue.
- Enter a description for the identifier.
- Enter the Bundle ID copied from Xcode.
- Scroll down and enable the Push Notifications capability (along with any others your app uses).
- Click Continue.
- Go to or open your Applimode project in VSCode.
- Click View (on the top menu of VSCode), then select Terminal.
- Run the following command.
node ./applimode-tool/index.js security- Select the security rule you want. (a, s, v)
Note
- a (all users) - Access is granted to all users, regardless of authentication status.
- s (signed-in users) - Access is restricted to users who have signed in to the application.
- v (verified users) - Access is restricted to users who have been verified by an administrator.
- Run the following command.
firebase deploy --only firestore- To allow only users designated as admins to write, follow these steps.
- Go to or open your Applimode project in VSCode.
- Click View (on the top menu of VSCode), then select Terminal.
- Run the following command.
node ./applimode-tool/index.js write- Type
yand pressEnter.
- Go to or open your Applimode project in VSCode.
- Click View (on the top menu of VSCode), then select Terminal.
- Run the following command.
node ./applimode-tool/index.js color- Type the color code in hex format (e.g., fcb126, f37d76).
Note
You can also change the main color in the Admin Settings after launching the app. For more detailed instructions, refer to the following chapter.
Note
- The long app name is mainly used for web apps.
- The short app name is mainly used for mobile apps (iOS, Android).
- To change the full or short name of your Applimode app, follow these steps.
- Go to or open your Applimode project in VSCode.
- Click View (on the top menu of VSCode), then select Terminal.
- To change the full name, run the following command.
node ./applimode-tool/index.js fullname- To change the short name, run the following command.
node ./applimode-tool/index.js shortname- Enter the desired name and press Enter.
Caution
It is recommended not to change the organization name unless absolutely necessary.
- To change the organization name of your Applimode app, follow these steps.
- Go to or open your Applimode project in VSCode.
- Click View (on the top menu of VSCode), then select Terminal.
- Run the following command.
node ./applimode-tool/index.js organization- Enter the desired organization name and press Enter.
- Open Google Cloud console in your web browser.
- Sign up or log in.
- Select your project on the top left.
- Click Activate Cloud Shell on the top right.
- Run the following command in the shell at the bottom.
echo '[{"origin": ["*"],"method": ["GET"],"maxAgeSeconds": 3600}]' > cors.json- Open or go to your Firebase console in your web browser.
- Click your project.
- Click Storage (on the left sidebar).
- Click the Copy folder path icon (on the right of the URL starting with gs://) to copy your cloud storage bucket.
- Go back to your Google Cloud console.
- Run the following command in the shell at the bottom.
gsutil cors set cors.json gs://<your-cloud-storage-bucket>- On your iOS device, open Settings.
- Choose General > VPN & Device Management.
- Choose the affected profile and trust it.
- On your mac, open System settings.
- Choose Privacy and Security > VPN & Device Management.
- Scroll down and click Allow anyway.
In iOS 14+, debug mode Flutter apps can only be launched from Flutter tooling, IDEs with Flutter plugins or from Xcode. Alternatively, build in profile or release modes to enable launching from the home screen.
- Click Product (on the top menu of Xcode), then click Scheme, and finally click Edit Scheme.
- Click Run in the left panel.
- Select Release from the Build Configuration dropdown menu in the Info tab.
- Close Xcode.
- Open or move to VSCode.
- If necessary, open your Applimode project. (File > Open Folder)
- Click the built-in terminal at the bottom. (or choose View > Terminal)
- Run the following commands.
flutter cleanflutter pub getcd iosrm -rf Podsrm -rf Podfile.lockpod install --repo-updatecd ..open ios/Runner.xcworkspace- Your Applimode project will open in Xcode.
- If there is no activity in Xcode's progress window, click Product (on the top menu of Xcode), then click Clean Build Folder.
- Click the play icon button on the top left. (or press
Command+R)
- Open VSCode
- Click File (on the top menu of VSCode) and select Open Folder.
- Select your project folder (maybe in the projects folder) and click Open.
- Click View (on the top menu of VSCode) and select Terminal.
- Run the following commands in order.
flutter cleanflutter pub cache repairflutter pub get- Enable Developer options and USB debugging on your android device.
- To enable Developer options and USB debugging on your android device, refer to this page.
- Try changing the USB Preferences to Charging or File transfers.
- Connet again.
- Open VSCode.
- Click File (on the top menu of VSCode) and select Open Folder.
- Select your project folder (maybe in the projects folder) and click Open.
- Click View (on the top menu of VSCode) and select Terminal.
- Run the following commands in order.
dart run build_runner cleandart run build_runner build --delete-conflicting-outputs- Open VSCode.
- Click File (on the top menu of VSCode) and select Open Folder.
- Select your project folder (maybe in the projects folder) and click Open.
- Click View (on the top menu of VSCode) and select Terminal.
- Run the following command.
open ios/Runner.xcworkspace